Lab 6: IoT Security and Wireless Exploitation
AFL lives at https://lcamtuf.coredump.cx/afl/. It hasn't been updated in a while. While AFL still works fine, there's a new project AFL++, a fork of AFL with lots of improvements and new features. AFL++ can be found at https://aflplus.plus/ with its source on GitHub. This article will look at using AFL++ to fuzz IoT binaries.
Fuzzing works best when we have the source code of the binary in question. Unfortunately for IoT binaries, this is often not the case. AFL++ (and AFL) ships with a companion tool (afl-gcc, afl-clang, etc) that works as a drop-in replacement to gcc, clang, or any other standard build tool. The tool is used to inject instrumentation in the generated binaries while compiling the source code. The instrumented binaries can then be fuzzed using afl-fuzz.
Fuzzing closed-source applications is tricky. For fuzzing such binaries, AFL++ can use Qemu, unicorn, or Frida and are named qemu mode, unicorn mode, and Frida mode respectively. These are binary-only instrumentation modes and are not as efficient as the source code instrumentation modes. We will be using Qemu mode in this article.
In Qemu mode, AFL++ uses qemu user mode emulation to run the binary. It uses a modified version of Qemu which instruments the basic blocks as the program executes. The instrumentation information thus generated is used to generate new test cases which trigger different code paths improving code coverage. AFL++ in qemu mode can also be used to instrument foreign arch binaries (like an arm binary on an x86_64 host). This is extremely useful for fuzzing IoT firmware binaries which are usually of ARM or MIPS architecture.
An important point to note is that AFL++ and similar fuzzers (AFL, hongfuzz, radamsa[test case generator only]) only work with file inputs That is the program must only receive the fuzzed input from a file. Programs that take in input from a socket are not supported.
For fuzzing socket-based programs we can take either of the following approaches:
- If the application's source code is available, rewrite the application to accept input from a file. Most of the time rewriting the entire application isn’t necessary. We can code in a small test function that reads in a file and uses the data to call another function that we want to fuzz.
- For closed-source apps, rewriting the source isn’t an option. In such cases, there are hacks to convert a socketed binary to use files instead. These methods usually use LD_PRELOAD to override socket functions and make them read/write from a file instead. Preeny and desockmulti are two such desocketing tools. However, these may not always work out of the box.
Compiling AFL++
AFL++ can be compiled on any Linux system. Here we are using an Ubuntu 20.04 LXD container. The steps are as follows:
$ sudo apt update
$ sudo apt install git make build-essential clang ninja-build pkg-config libglib2.0-dev libpixman-1-dev
$ git clone https://github.com/AFLplusplus/AFLplusplus
$ cd AFLplusplus/
$ make all
$ cd qemu_mode
$ CPU_TARGET=arm ./build_qemu_support.sh
Fuzzing simple IoT binaries
We will be using a firmware for the Cisco RV130 VPN router which can be downloaded from https://software.cisco.com/download/home/285026141/type/282465789/release/1.0.3.55?i=!pp. The file is named RV130X_FW_1.0.3.55.bin
After extracting the binary using binwalk the extracted file system looks like
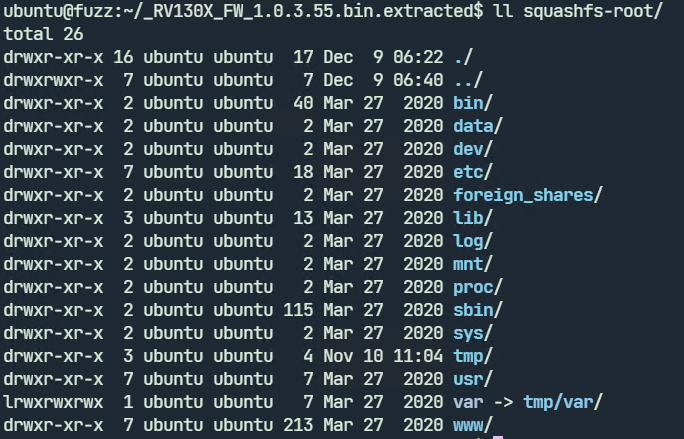 Extracted filesystem of Cisco RV130X firmware binary
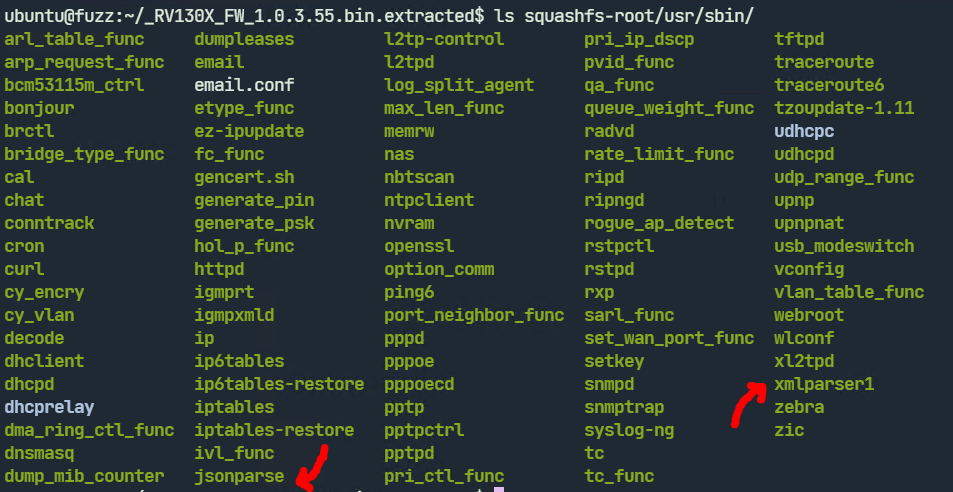
We will be looking at fuzzing the jsonparse and xmlparser1 binary in /usr/sbin/. These programs accept input from a file and are ideal for fuzzing. We don’t have the source available so we have to use Qemu mode.
Fuzzing xmlparser1
Before fuzzing we need to know how the program accepts input. Running xmlparser1 with qemu-arm-static with the –help parameter shows the usage. It accepts a filename with the -f parameter. The -d parameter stands for debugging.

We can create a test XML file and run xmlparser1.
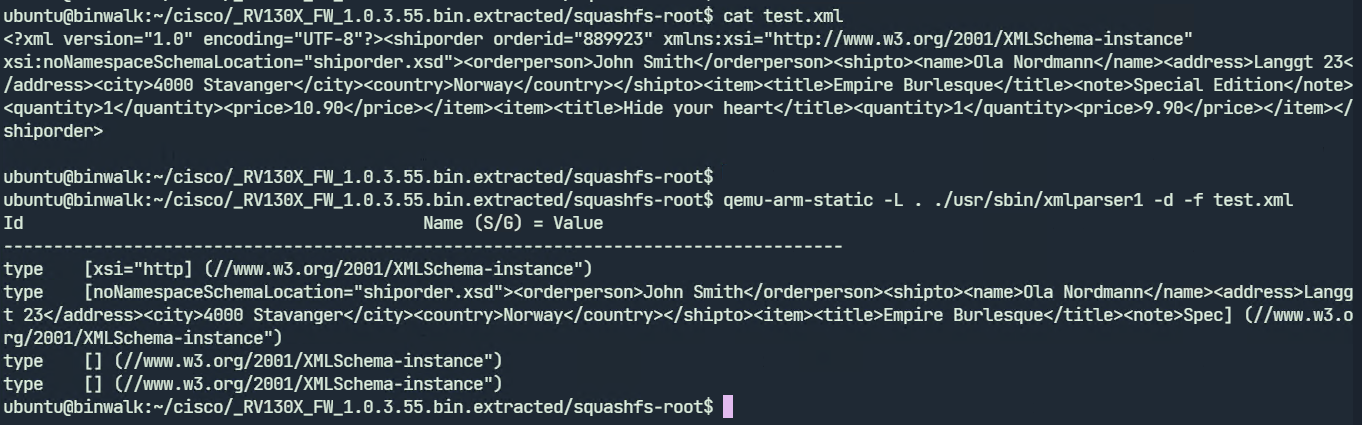
xmlparser1 displays the parsed contents of the test.xml file. We may now proceed to fuzz. To run the fuzzer we need to give an input file that the fuzzer will use to generate further test cases. We will specify test.xml as our input file.
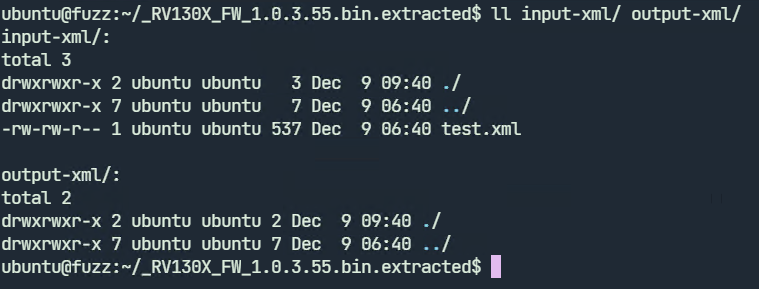
Create two directories input-xml and output-xml and move the test.xml file to input-xml as shown.
We can now launch afl-fuzz

$ QEMU_LD_PREFIX=./squashfs-root/ ../AFLplusplus/afl-fuzz \
            -Q \
            -i input-xml/ \
            -o output-xml/ \
            -- ./squashfs-root/usr/sbin/xmlparser1 -f @@
The options are explained below:
- -Q: Use AFL++ in Qemu mode
- -i: The path to the input directory
- -o: The path to the output directory. This directory will contain files that trigger an interesting behavior on the binary such as a crash or hang
Everything after the double hyphen (--) specifies the target program to run along with its arguments. The @@ parameter stands for the filename. At runtime, AFL++ will replace the @@ parameter with the name of the input file.
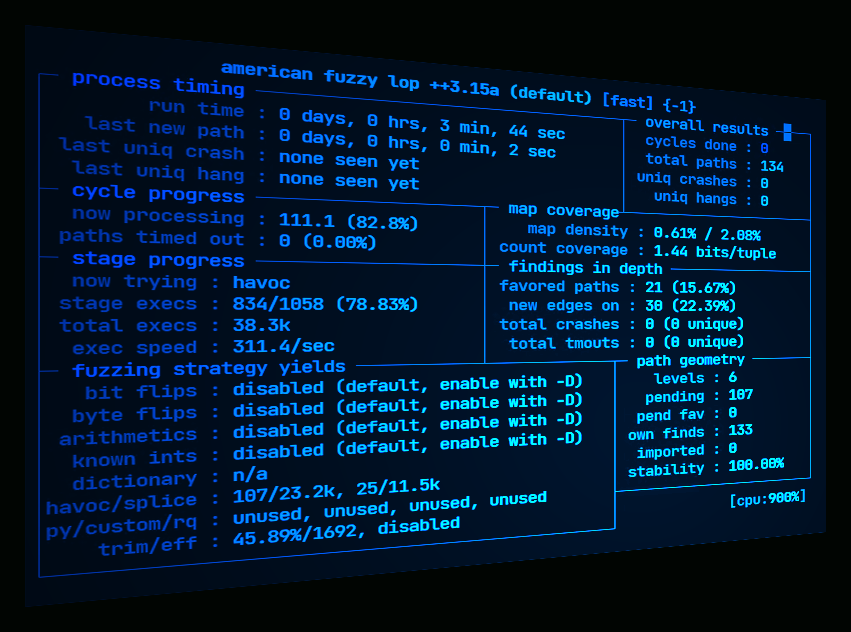
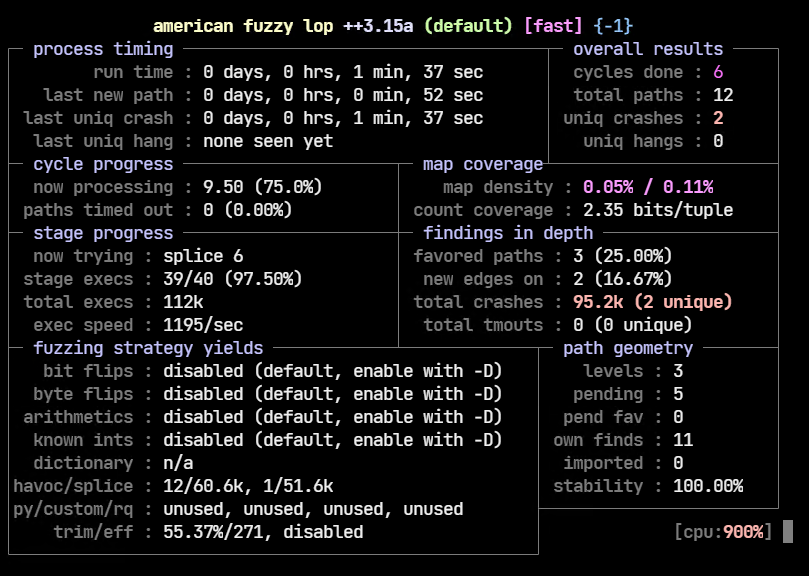
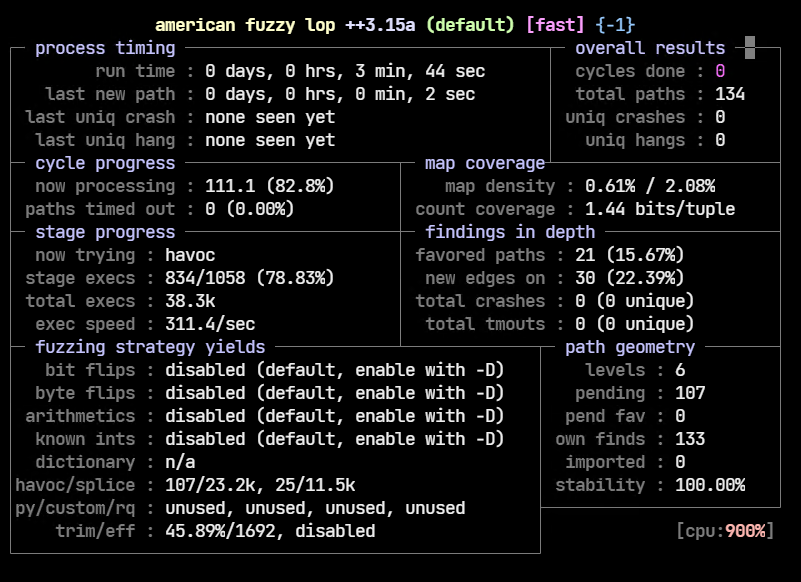
The fuzzing session starts as shown below. We can press Ctrl+C anytime to exit.
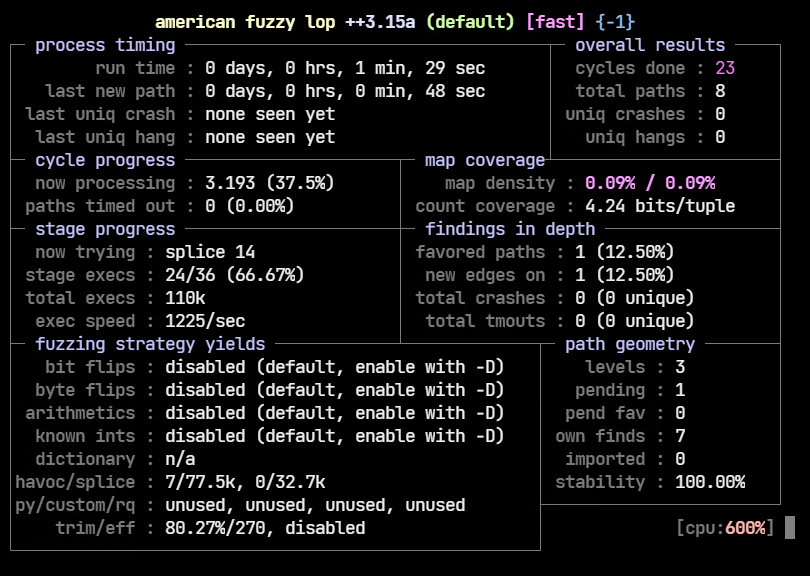
In our brief test, AFL++ wasn’t able to crash the application.
Fuzzing jsonparse
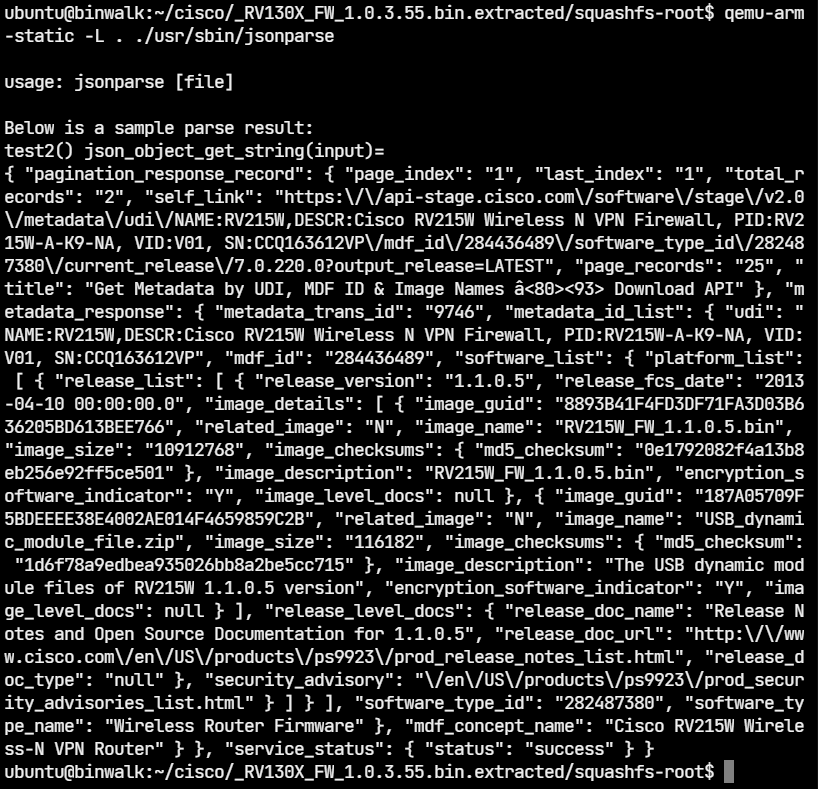
Jsonparse is a similar binary but it parses JSON files instead of XML. Running the program without any arguments displays its usage.
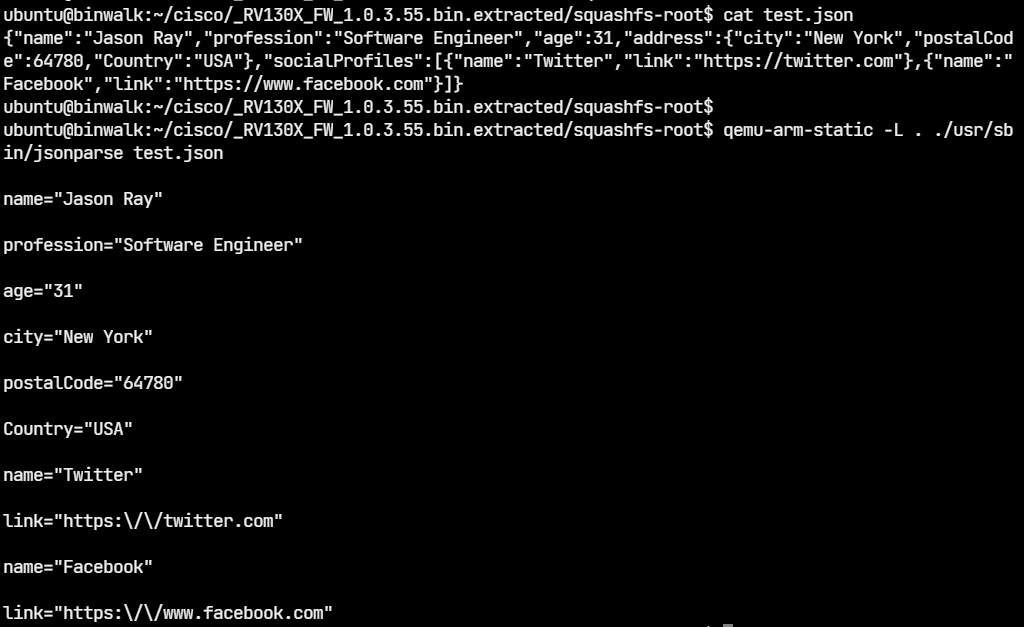
We can create a test JSON file and run jsonparser on it.
We can use the same test.json file as input to the fuzzer. In a similar way, create two directories named input-json and output-json with test.json in directory input-json.
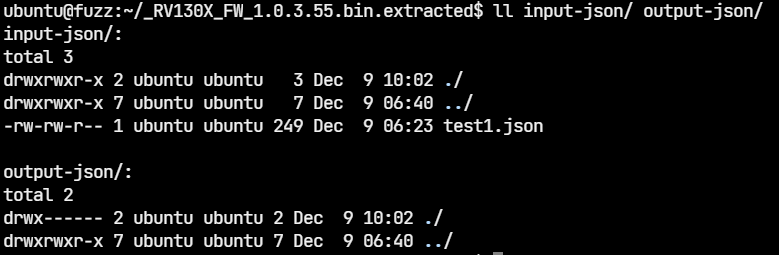
We can run the fuzzer as shown:

$ QEMU_LD_PREFIX=./squashfs-root/ ../AFLplusplus/afl-fuzz \
            -Q \
            -i input-json / \
            -o output-json / \
            -- ./squashfs-root/usr/sbin/jsonparser @
After fuzzing for a couple of minutes, there are two unique crashes already.
Let’s explore the output-json directory to have a look at the files which crashed jsonparser.
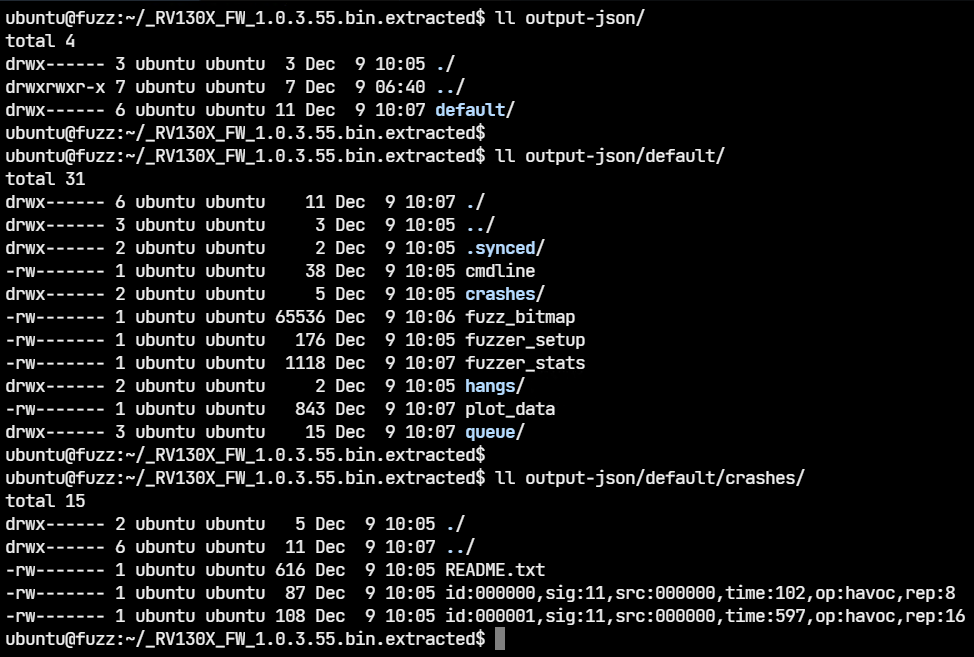
The two files which triggered the crashes are in the output-json/default/crashes directory.


To cross-check, we can run jsonparser with one of the generated files.

Jsonparser indeed crashes with a segfault. From here on, the next steps are to identify the root cause of the bug and check if it's exploitable. Not all crashes are exploitable. Triaging the crash is out of the scope of this post.
Fuzzing web
In this post, we will be looking at socketed binaries. Fuzzing binaries that communicate over the network using sockets are different from fuzzing binaries that use file-based I/O. Vanilla AFL and AFL++ don’t support fuzzing socketed binaries although there have been projects such as AFLNet and AFLNW which use modified versions of AFL for the same. Here, however, we will see how to use plain AFL++ to fuzz network programs. The httpd binary at /usr/sbin/httpd is the web server for the firmware and can be used as a candidate for fuzzing.
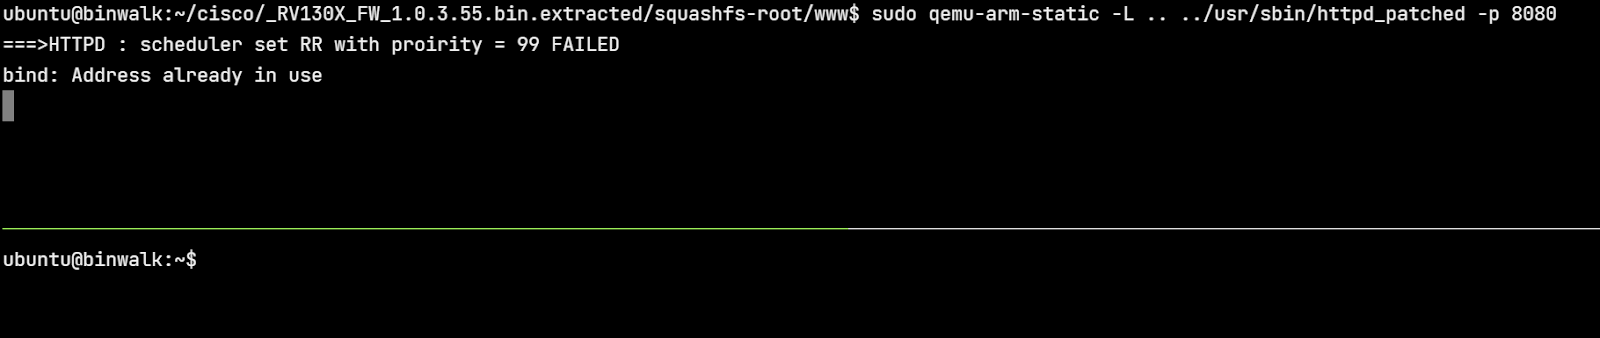
We can launch httpd with sudo as shown. Sudo is needed to bind on port 80.

Note that qemu is started from within the www/ directory as this is where the web resources (html, css, js files) are. Although it shows a bind error, running netstat confirms that httpd is indeed listening on port 80.

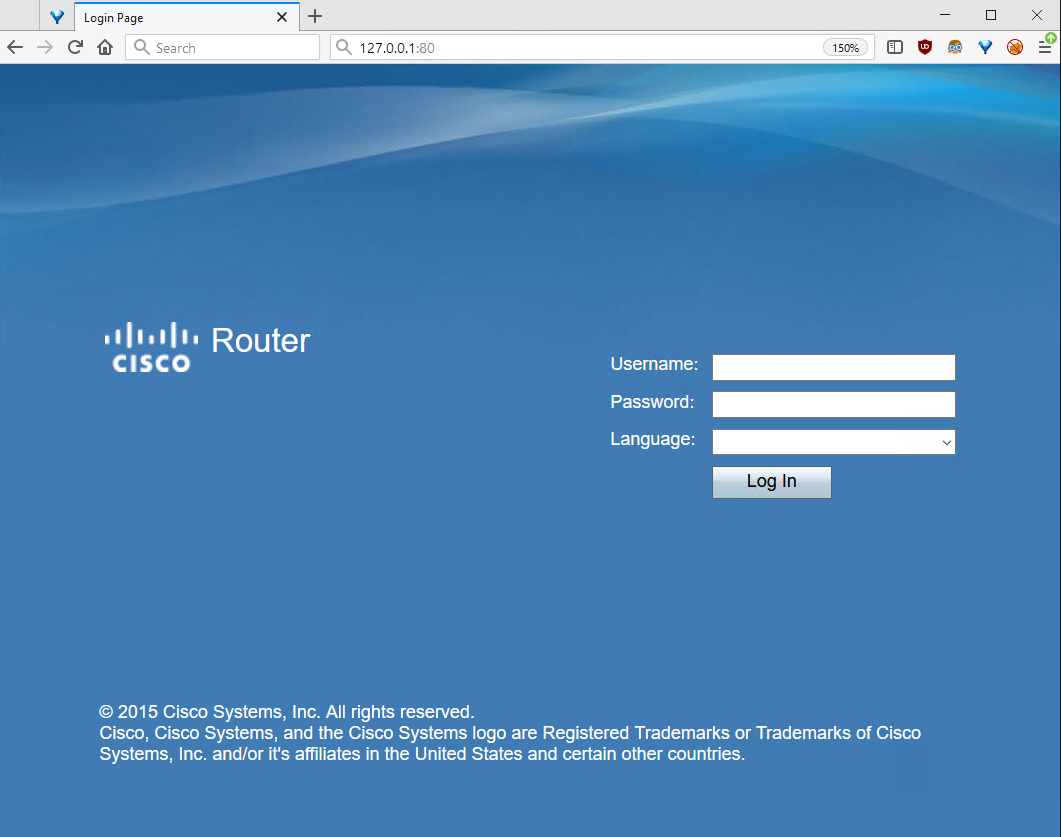
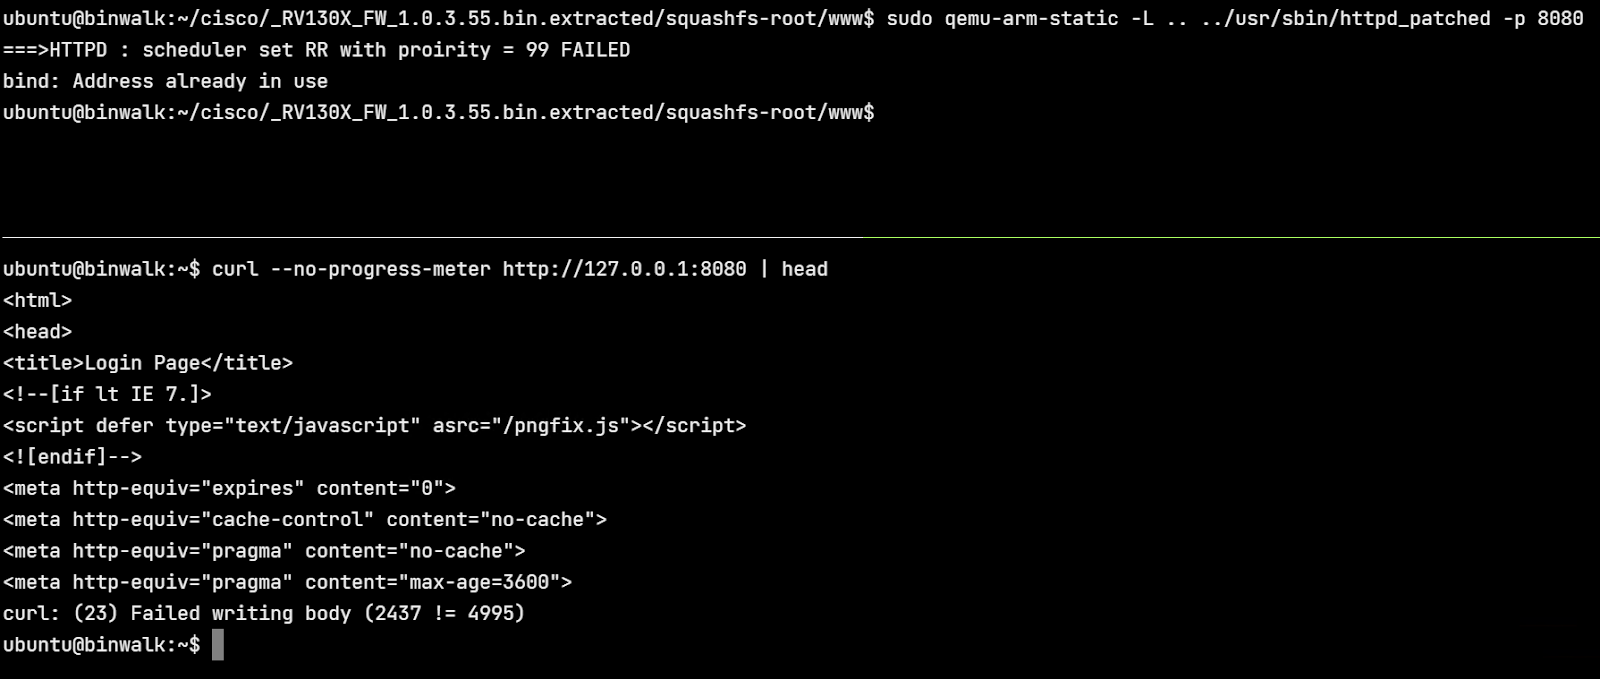
We can open http://127.0.0.1 to cross-check that the web interface is accessible.
The web interface can also be accessed using curl.
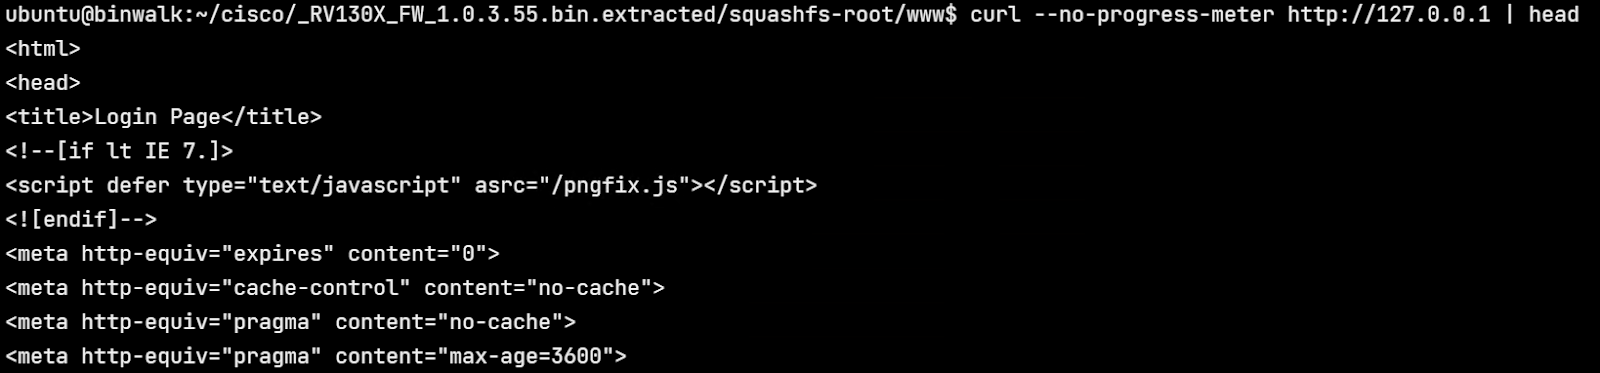
Using an intercepting proxy such as Burp Suite, we can view the actual HTTP requests that are being sent. Trying to log in to the dashboard with the credentials admin:123456 results in a POST request as shown.
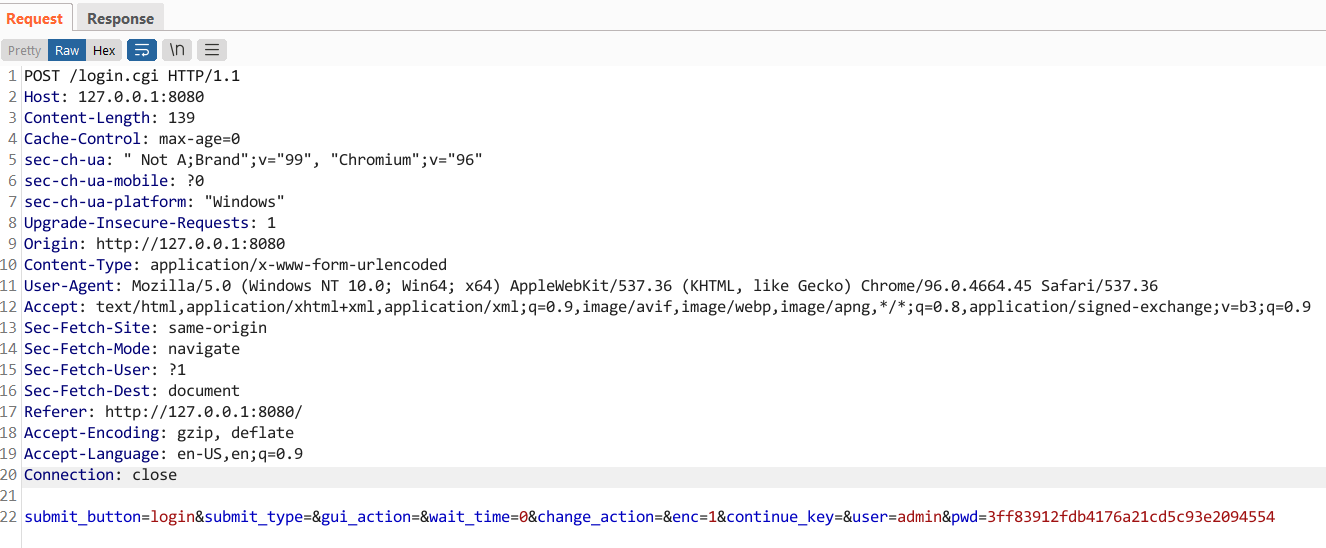
In the image above we are running the webserver over port 8080 (rather than 80) by appending -p 8080 to the qemu command line.
From here on, the idea is to modify this base request using the fuzzer in subtle ways such that it crashes the web server.
The naive way is to send actual requests over the network. However, this would be slow. The smarter and recommended way is to make the webserver read the HTTP request data from a file. We will look at both ways.
Naive fuzzing using Radamsa
Radamsa is not a fuzzer. It's a test case generator that reads in a file and modifies it in subtle ways. How to use the modified output is up to us. Here we will send the output from the file to the running web server.
# fuzz-radamsa.py
import socket
import pyradamsa

base_login_request = open("base-login-request.txt", "rb").read()

rad = pyradamsa.Radamsa()
i = j = 0

while True:
    # Create a modified request based on the base request
    fuzzed_request = rad.fuzz(base_login_request)

    sock = socket.socket(socket.AF_INET, socket.SOCK_STREAM)

    # 1 second timeout
    sock.settimeout(1)

    sock.connect(("127.0.0.1", 8080))

    j += 1
    print(f"[+] Request {j} - ", end="")

    sock.sendall(fuzzed_request)
    try:
            sock.recv(50000)
        print("OK")
    except Exception as ex:
            i += 1
            open(f"interesting/{i}.txt", "wb").write(fuzzed_request)
            print(f" {ex} -> saved to {i}.txt")
       sock.close()
The code above uses Radamsa to generate modified request data using the base login request. This data is then sent over the socket to the web server running at port 8080. If the server doesn’t respond within 1 second, the input is saved to a file in the interesting directory.
We can run the fuzzer as shown.
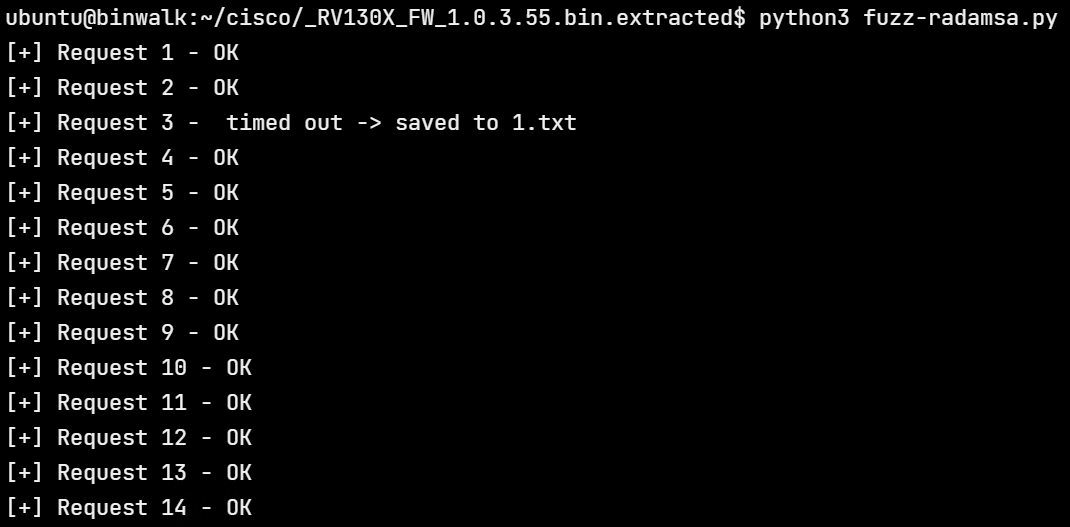
Request 3 timed out while responding and the corresponding input was saved to 1.txt. Note that a timeout is not the same as a crash. Had the server crashed on request 3, further requests wouldn’t be successful. Fuzzing this way is highly inefficient, slow, and error-prone and would often lead to false positives.
Fuzzing with AFL++
As discussed before, to fuzz with AFL, the program must accept input from a file. We do not have the source code of httpd which we can modify for our purpose. Hence we have to resort to binary-level modifications, such as patching the assembly instructions and LD_PRELOAD tricks. Using the latter we can override network functions in libc to make them accept input from a file instead. The desockmulti project on GitHub can be used for this purpose.
Before showing how to use desockmulti, we need to make a few modifications of our own. The httpd binary currently forks to the background using the daemon function. We do not want this forking behavior during fuzzing.
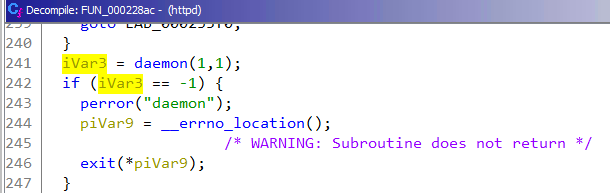
We need to override the daemon such that it returns 0 without forking actually. This can be done both with LD_PRELOAD or by patching the assembly instructions.
The other change that we need to make is to have httpd process exactly 1 request (unlike a typical web server that processes requests indefinitely) before quitting. This way we can know which request, if any, crashes the web server.
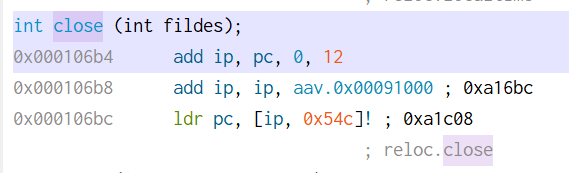
To close a socket, httpd calls the close function. There are three locations from where close is called.

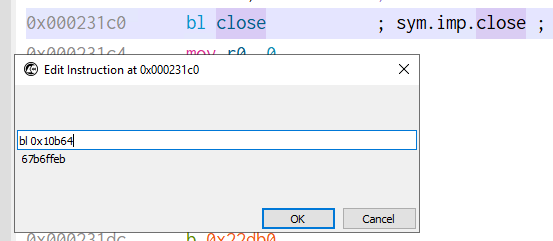
Among them, we need to modify the one at 231c0 to call exit(0) instead of close.

To patch the instructions we will use Cutter which is a GUI for radare2. Ghidra also supports patching binaries but Cutter is better suited for this use case.
Navigating to 0x231c0 in Cutter, we come across the following disassembly.

Double-clicking on close takes us to 0x106b4.
The exit function is located at 0x10b64.
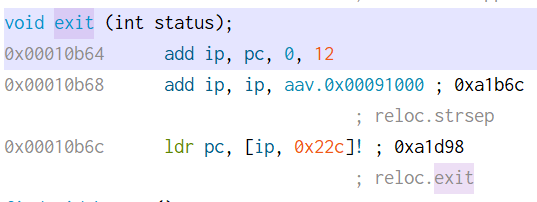
We can thus change bl close to bl 0x10b64 to call the exit function instead.
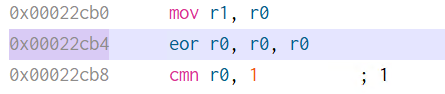
The instruction immediately before can be changed from mov r0, sl to eor r0, r0 which sets register r0 to 0 to give us the following disassembly.

The net effect is that it calls exit(0). The other change we need to do is patch out the daemon call at 0x22CB4.

We can change the instruction to eor r0, r0 to make the application believe the call succeeded.
Finally, with the changes in place go to File -> Commit changes to save the modifications. Let's rename the file to httpd_patched.
Testing patched httpd
Running httpd_patched we can see that it doesn’t fork to the background.
Additionally, it quits after processing a single request as shown below.
Setting up desockmulti
We need to use an ARM cross-compiler to compile desockmulti. The armv7-eabihf-uclibc toolchain from bootlin works great for this purpose. We need to use a uclibc-based toolchain as the firmware binaries also use the same. Running the file command on /usr/bin/httpd points out the binary is dynamically linked to ld-uClibc.
$ file usr/sbin/httpd
usr/sbin/httpd: ELF 32-bit LSB executable, ARM, EABI4 version 1 (SYSV), dynamically linked, interpreter /lib/ld-uClibc.so.0, stripped
Before compiling desockmulti, we have to make a tiny change to its source.
$ git diff
diff --git a/desockmulti.c b/desockmulti.c
index 719e6ac..6bcc223 100644
--- a/desockmulti.c
+++ b/desockmulti.c
@@ -450,7 +450,7 @@ int socket(int domain, int type, int protocol)
                pthread_mutex_unlock(&mutex);
        }

-       setup_timer();
+       //setup_timer();

        if ((fd = original_socket(AF_UNIX, SOCK_STREAM, 0)) < 0) {
                perror("socket error");
In desockmulti.c there’s a call to a setup_timer function that needs to be commented out as shown in the diff above.
We can then run make specifying the path to the arm-linux-gcc compiler in the CC environment variable.
$ make CC=~/armv7-eabihf--uclibc--stable-2020.08-1/bin/arm-linux-gcc
The generated file desockmulti.so can be copied to the squashfs-root directory.
Testing desockmulti
To test that desockmulti is indeed working as expected we can debug httpd with gdb-multiarch. First, we need to add a dependency to the library libpthread.so.0 using patchelf. Patchelf can be installed using apt. This is necessary as desockmulti uses threads while httpd doesn’t link to libpthread by default.
$ patchelf --add-needed ./lib/libpthread.so.0 ./usr/sbin/httpd_patched
In terminal 1, run the binary in qemu specifying the -g parameter.
ubuntu@binwalk:~/cisco/_RV130X_FW_1.0.3.55.bin.extracted/squashfs-root/www$ sudo qemu-arm-static -g 5555 -L .. -E USE_RAW_FORMAT=1 -E LD_PRELOAD=../desockmulti.so ../usr/sbin/httpd_patched
-p 8080 < ../../base-login-request.txt
The path to desockmulti.so is specified in the LD_PRELOAD environment variable. The other variable USE_RAW_FORMAT is specific to desockmulti.
In another terminal, we can start gdb-multiarch, set a breakpoint on fprintf, and attach it to port 5555.
$ gdb-multiarch -q ./usr/sbin/httpd
GEF for linux ready, type `gef' to start, `gef config' to configure
95 commands loaded for GDB 9.2 using Python engine 3.8
[*] 1 command could not be loaded, run `gef missing` to know why.
Reading symbols from ./usr/sbin/httpd...
(No debugging symbols found in ./usr/sbin/httpd)
gef➤  b fprintf
Breakpoint 1 at 0x10a38
gef➤  target remote :5555
…
gef➤  c
When the breakpoint on fprintf hits we can press c and continue for a couple of times to finally inspect the contents of the register r2.
0xfffe5fa8│+0x0018: 0x30303220  →  0x30303220
0xfffe5fac│+0x001c: 0x0d6b4f20  →  0x0d6b4f20
─────────────────────────────────────── code:arm:ARM ────
   0xff4eb7b8 <fprintf+4>      push   {lr}              ; (str lr,  [sp,  #-4]!)
   0xff4eb7bc <fprintf+8>      add    r2,  sp,  #8
   0xff4eb7c0 <fprintf+12>     ldr    r1,  [sp,  #4]
 → 0xff4eb7c4 <fprintf+16>     bl     0xff4ee024 <vfprintf>
   ↳  0xff4ee024 <vfprintf+0>     push   {r4,  r5,  r6,  r7,  r8,  lr}
      0xff4ee028 <vfprintf+4>     mov    r5,  r0
      0xff4ee02c <vfprintf+8>     ldr    r6,  [r0,  #76]        ; 0x4c
      0xff4ee030 <vfprintf+12>    ldr    r12,  [pc,  #144]      ; 0xff4ee0c8 <vfprintf+164>
      0xff4ee034 <vfprintf+16>    cmp    r6,  #0
      0xff4ee038 <vfprintf+20>    add    r12,  pc,  r12
──────────────────────────────────── arguments (guessed) ────
vfprintf (
   $r0 = 0x000be3c0 → 0xff006085 → 0xff006085,
   $r1 = 0x00093f5c → 0x00007325 → 0x00007325,
   $r2 = 0xfffe5f98 → 0xfffe5fa0 → 0x50545448 → 0x50545448,
   $r3 = 0x000006c8 → 0x000006c8
)
────────────────────────────────────────────── threads ────
[#0] Id 1, stopped 0xff4eb7c4 in fprintf (), reason: BREAKPOINT
───────────────────────────────────────────── trace ────
[#0] 0xff4eb7c4 → fprintf()
[#1] 0x1dd5c → add sp,  sp,  #1004      ; 0x3ec
───────────────────────────────────────────────────────────
gef➤  x/s *$r2
0xfffe5fa0:     "HTTP/1.1 200 Ok\r\n"
R2 points to a readable string "HTTP/1.1 200 Ok\r\n" which is the first line of a typical HTTP response. This indicates that desockmulti is working. We are not able to see the HTTP response on-screen but nevertheless, it's working as intended.
At this point we can start fuzzing httpd_patched however, we can further make quality-of-life improvements. For example, the binary requires root to run. It prints the following error message if started without root.
ubuntu@binwalk:~/cisco/_RV130X_FW_1.0.3.55.bin.extracted/squashfs-root/www$ qemu-arm-static -L .. -E USE_RAW_FORMAT=1 -E LD_PRELOAD=../desockmulti.so ../usr/sbin/httpd_patched -p 8080 < ../../base-login-request.txt
===>HTTPD : scheduler set RR with proirity = 99 FAILED
--- [1640588459:322474] accept_num=1, connect_num=0
--- [1640588459:323006] Get pkt, sockindex=0, length=943, pkt[0]=80
+++ [1640588459:323333] Intercepted socket()! original type=AF_INET6 fd=4
--- [1640588459:323785] preeny socket bound, Emulating bind on port 8080
--- [1640588459:324011] preeny listen called, accepting connections ...
--- [1640588459:324223] preeny connect_write for serverfd=4 started
--- [1640588459:324466] preeny connect succeeds, write for serverfd=4, client sock index=0
--- [1640588459:324778] preeny write a 943 bytes packet, client socket index = 0, client sockfd=5
--- [1640588459:325074] preeny connection for serverfd=4 client sockfd=5 shutdown
--- [1640588459:325151] pthread_created or directly called for preeny_connect_write, accept_done_num 1, selected_fd_index 0
+++ [1640588459:325246] Intercepted socket()! original type=AF_INET6 fd=6
--- [1640588459:325334] preeny socket bound, Emulating bind on port 8080
--- [1640588459:325393] preeny listen called, accepting connections ...
+++ [1640588459:325488] Intercepted socket()! original type=AF_INET fd=7
--- [1640588459:325725] preeny socket bound, Emulating bind on port 8080
--- [1640588459:325747] preeny listen called, accepting connections ...
+++ [1640588459:325976] Intercepted socket()! original type=AF_INET fd=8
--- [1640588459:326095] preeny socket bound, Emulating bind on port 81
--- [1640588459:326118] preeny listen called, accepting connections ...
+++ [1640588459:326480] Intercepted socket()! original type=AF_INET6 fd=9
--- [1640588459:329767] preeny socket bound, Emulating bind on port 81
--- [1640588459:329820] preeny listen called, accepting connections ...
/var/run/httpd.pid: Permission denied
+++ [1640588459:330676] shutting down desockmulti...
+++ [1640588459:330844] ... shutdown complete!
It fails on trying to access /var/run/httpd.pid. We can patch the binary and change the path to something which doesn’t require root privilege to access. This can be done using a hex editor and also with Cutter.
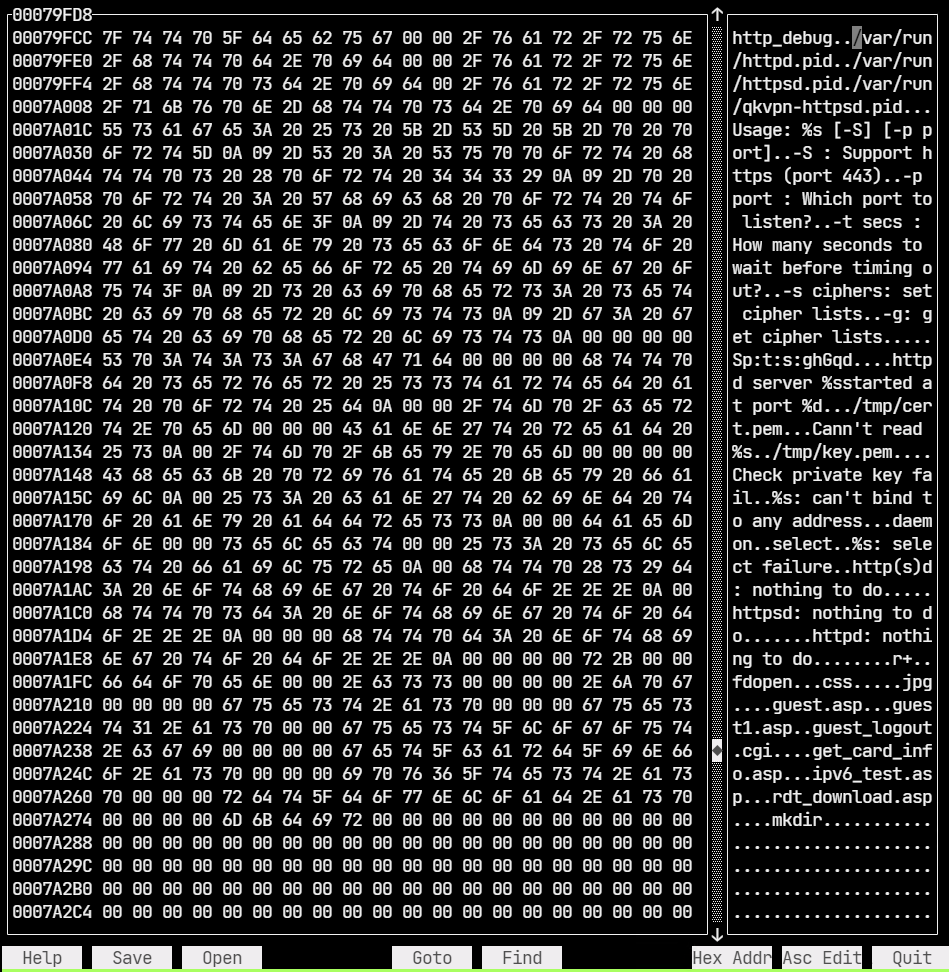
We can change /var/run/httpd.pid to /home/ubuntu/h.pid and save. The new path is located under the home directory and can be accessed without root. It’s also important to note the length of the replacement string must be less than or equal to the original.
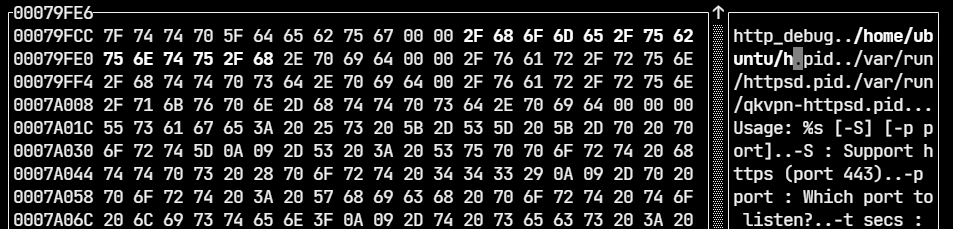
Rerunning httpd_patched we can see it doesn’t show the permission denied error anymore.
ubuntu@binwalk:~/cisco/_RV130X_FW_1.0.3.55.bin.extracted/squashfs-root/www$ qemu-arm-static -L .. -E USE_RAW_FORMAT=1 -E LD_PRELOAD=../desockmulti.so ../usr/sbin/httpd_patched -p 8080 < ../../base-login-request.txt
===>HTTPD : scheduler set RR with proirity = 99 FAILED
--- [1640594090:533269] accept_num=1, connect_num=0
--- [1640594090:533738] Get pkt, sockindex=0, length=943, pkt[0]=80
+++ [1640594090:533930] Intercepted socket()! original type=AF_INET6 fd=4
--- [1640594090:534277] preeny socket bound, Emulating bind on port 8080
--- [1640594090:534400] preeny listen called, accepting connections ...
--- [1640594090:534562] preeny connect_write for serverfd=4 started
--- [1640594090:534704] preeny connect succeeds, write for serverfd=4, client sock index=0
--- [1640594090:534880] preeny write a 943 bytes packet, client socket index = 0, client sockfd=5
--- [1640594090:535045] preeny connection for serverfd=4 client sockfd=5 shutdown
--- [1640594090:535144] pthread_created or directly called for preeny_connect_write, accept_done_num 1, selected_fd_index 0
+++ [1640594090:535228] Intercepted socket()! original type=AF_INET6 fd=6
--- [1640594090:535283] preeny socket bound, Emulating bind on port 8080
--- [1640594090:535316] preeny listen called, accepting connections ...
+++ [1640594090:535359] Intercepted socket()! original type=AF_INET fd=7
--- [1640594090:535389] preeny socket bound, Emulating bind on port 8080
--- [1640594090:535404] preeny listen called, accepting connections ...
+++ [1640594090:535432] Intercepted socket()! original type=AF_INET fd=8
--- [1640594090:535478] preeny socket bound, Emulating bind on port 81
--- [1640594090:535511] preeny listen called, accepting connections ...
+++ [1640594090:535559] Intercepted socket()! original type=AF_INET6 fd=9
--- [1640594090:535601] preeny socket bound, Emulating bind on port 81
--- [1640594090:535632] preeny listen called, accepting connections ...
--- [1640594090:537111] Accept socket at serverfd=4, got fd=10, accept_sock_num=1.
+++ [1640594090:550073] shutting down desockmulti...
+++ [1640594090:550229] ... shutdown complete!
Additionally, the file h.pid is created within the user's home directory.
$ ls -la /home/ubuntu/h.pid
-rw-rw-r-- 1 ubuntu ubuntu 4 Dec 27 08:34 /home/ubuntu/h.pid
Fuzzing httpd
We can now finally proceed to fuzz the patched httpd binary. We need to create two directories: input-httpd and output-httpd. The former will contain the file base-login-request.txt which AFL++ will use to generate further test cases.
ubuntu@fuzz:~/_RV130X_FW_1.0.3.55.bin.extracted/squashfs-root/www$ QEMU_LD_PREFIX=.. QEMU_SET_ENV=USE_RAW_FORMAT=1,LD_PRELOAD=../desockmulti.so ../../../AFLplusplus/afl-fuzz -Q -i ../../input-httpd/ -o ../../output-httpd/ -- ../usr/sbin/httpd_patched -p 8080
We can leave the fuzzer as is to continue fuzzing. To quit press Ctrl+C anytime. In our brief test, AFL++ wasn’t able to crash the application.
With this, we come to the end of the two-part AFL fuzzing series. In the first part, we saw how to fuzz simple binaries which accepted input from a file. They required no modifications and were straightforward to fuzz. In this part, we learned how to convert a socketed binary to accept input from a file instead. This required patching the binary on an assembly level and using LD_PRELOAD further to override libc functions. We also saw how to use radamsa to generate test cases as a crude way to fuzz. There is no universal technique that can be applied as-is to fuzz any given closed IoT firmware binary. It will vary on a case-by-case basis but the idea is similar. For any comments, questions or suggestions feel free to leave a comment below.
Reference
Barun (2022) Fuzzing IOT binaries with AFL++ - part I, Attify Blog - IoT Security, Pentesting and Exploitation. Attify Blog - IoT Security, Pentesting and Exploitation. Available at: https://blog.attify.com/fuzzing-iot-devices-part-1/ (Accessed: October 31, 2022).
Barun (2022) Fuzzing IOT binaries with AFL++ - part II, Attify Blog - IoT Security, Pentesting and Exploitation. Attify Blog - IoT Security, Pentesting and Exploitation. Available at: https://blog.attify.com/fuzzing-iot-binaries-with-afl-part-ii/ (Accessed: October 31, 2022).
Assignment
(1 - easy) liar
Give me some number:
http://116.7.234.225/files/7a4de0b926cda8e43285c4373b68cd23/liar
(2 - easy) ezreverse
Give me some string with lowercase letter and number
http://116.7.234.225/files/5fbc944afb51241104f3b95605de2436/ezreverse
(3 - easy) LuckyGuess
Hook the binary
http://116.7.234.225/files/ffdaed751038587f1ea6a9c9552b0452/LuckyGuess