Forensics
https://ctf101.org/forensics
Forensics is the art of recovering the digital trail left on a computer. There are plenty of methods to find data that is seemingly deleted, not stored, or worse, covertly recorded.
An important part of Forensics is having the right tools, as well as being familiar with the following topics:
- File Formats
- EXIF data
- Wireshark & PCAPs
- What is Wireshark
- Steganography
- Disk Imaging
File Formats
File Extensions are not the sole way to identify the type of a file, files have certain leading bytes called file signatures which allow programs to parse the data consistently. Files can also contain additional "hidden" data called metadata which can be useful in finding out information about the context of a file's data.
File Signatures
File signatures (also known as File Magic Numbers) are bytes within a file used to identify the format of the file. Generally, they’re 2-4 bytes long, found at the beginning of a file.
What is it used for?
Files can sometimes come without an extension, or with incorrect ones. We use file signature analysis to identify the format (file type) of the file. Programs need to know the file type to open properly.
How do you find the file signature?
You need to be able to look at the binary data that constitutes the file you’re examining. To do this, you’ll use a hexadecimal editor. Once you find the file signature, you can check it against file signature repositories such as Gary Kessler’s.
Example

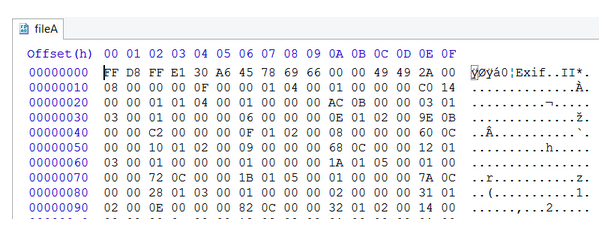
The file above, when opened in a Hex Editor, begins with the bytes FFD8FFE0 00104A46 494600 or in ASCII ˇÿˇ‡ JFIF where \x00 and \x10 lack symbols.
Searching in Gary Kessler’s database shows that this file signature belongs to a JPEG/JFIF graphics file, exactly what we suspect.
Metadata
Metadata is data about data. Different types of files have different metadata. The metadata on a photo could include dates, camera information, GPS location, comments, etc. For music, it could include the title, author, track number, and album.
What kind of file metadata is useful?
Potentially, any file metadata you can find could be useful.
How do I find it?
EXIF Data is metadata attached to photos which can include location, time, and device information.
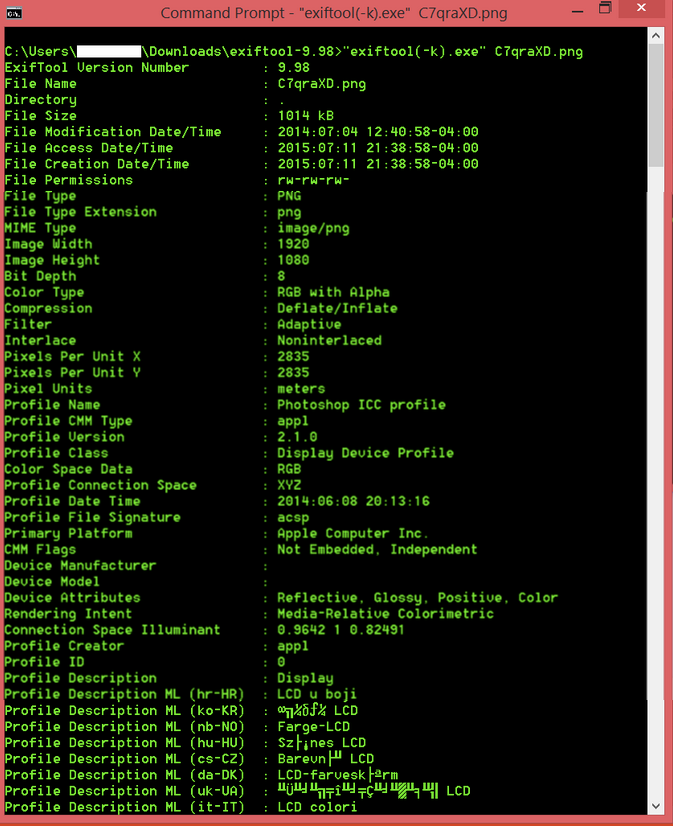
One of our favorite tools is ExifTool, which displays metadata for an input file, including: - File size - Dimensions (width and height) - File type - Programs used to create (e.g. Photoshop) - OS used to create (e.g. Apple)
Run command line: exiftool(-k).exe [filename] and you should see something like this:
Example
Let's take a look at File A's metadata with ExifTool:
File type
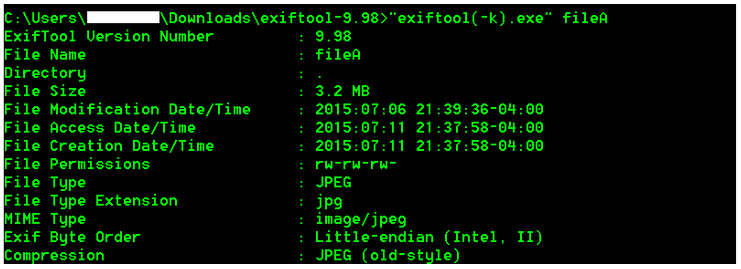
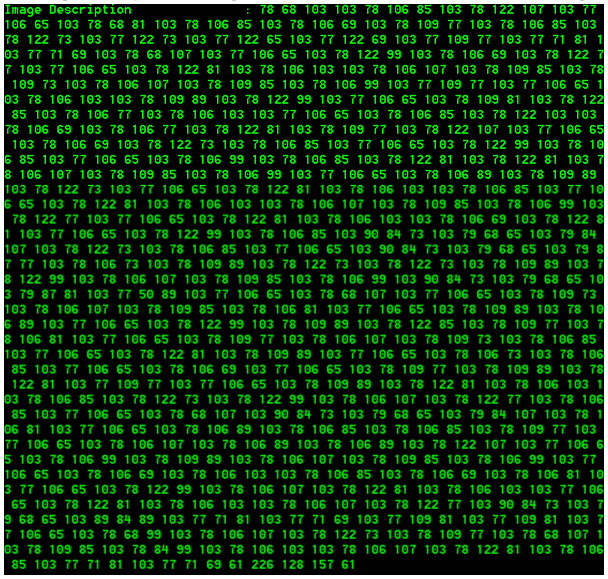
Image description
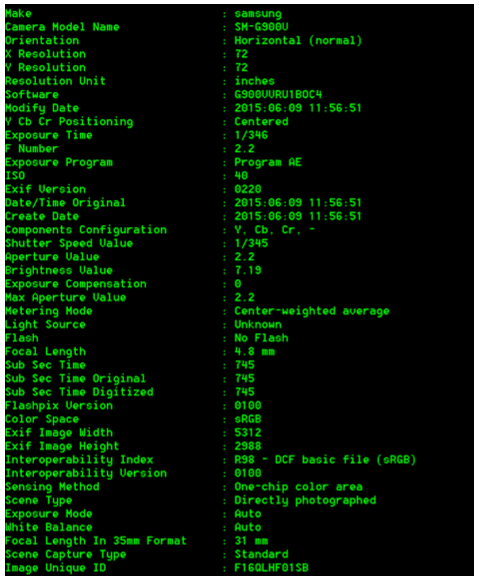
Make and camera info
GPS Latitude/Longitude

Timestamps
Timestamps are data that indicate the time of certain events (MAC): - Modification – when a file was modified - Access – when a file or entries were read or accessed - Creation – when files or entries were created
Types of timestamps
- Modified
- Accessed
- Created
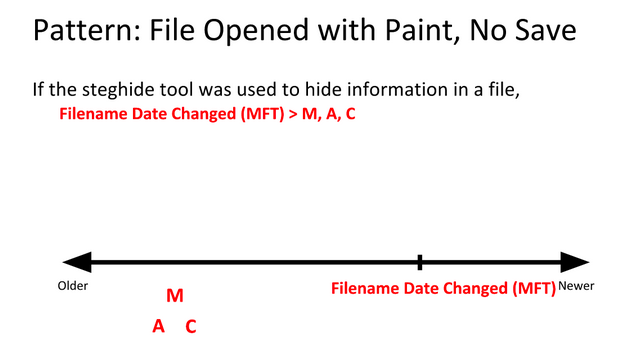
- Date Changed (MFT)
- Filename Date Created (MFT)
- Filename Date Modified (MFT)
- Filename Date Accessed (MFT)
- INDX Entry Date Created
- INDX Entry Date Modified
- INDX Entry Date Accessed
- INDX Entry Date Changed
Why do we care?
Certain events such as creating, moving, copying, opening, editing, etc. might affect the MAC times. If the MAC timestamps can be attained, a timeline of events could be created.
Timeline Patterns
There are plenty more patterns than the ones introduced below, but these are the basics you should start with to get a good understanding of how it works, and to complete this challenge.
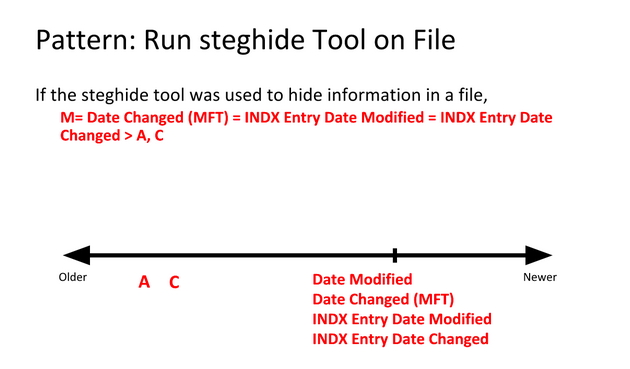
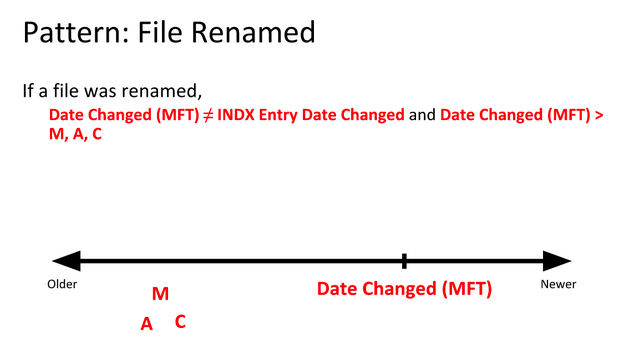
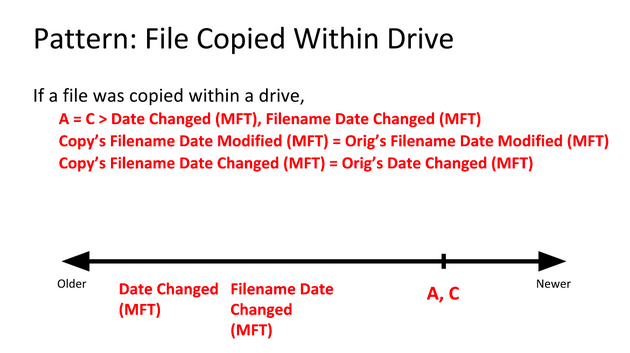
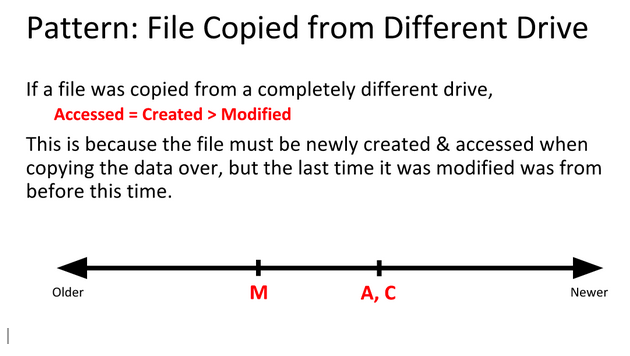
Examples
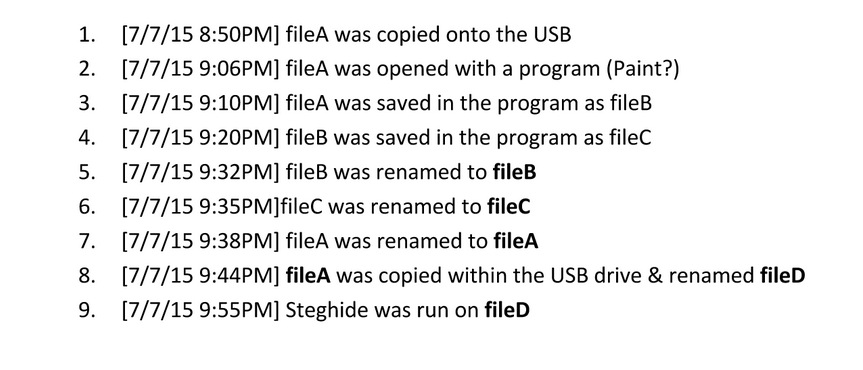
We know that the BMP files fileA and fileD are the same, but that the JPEG files fileB and fileC are different somehow. So how can we find out what went on with these files?
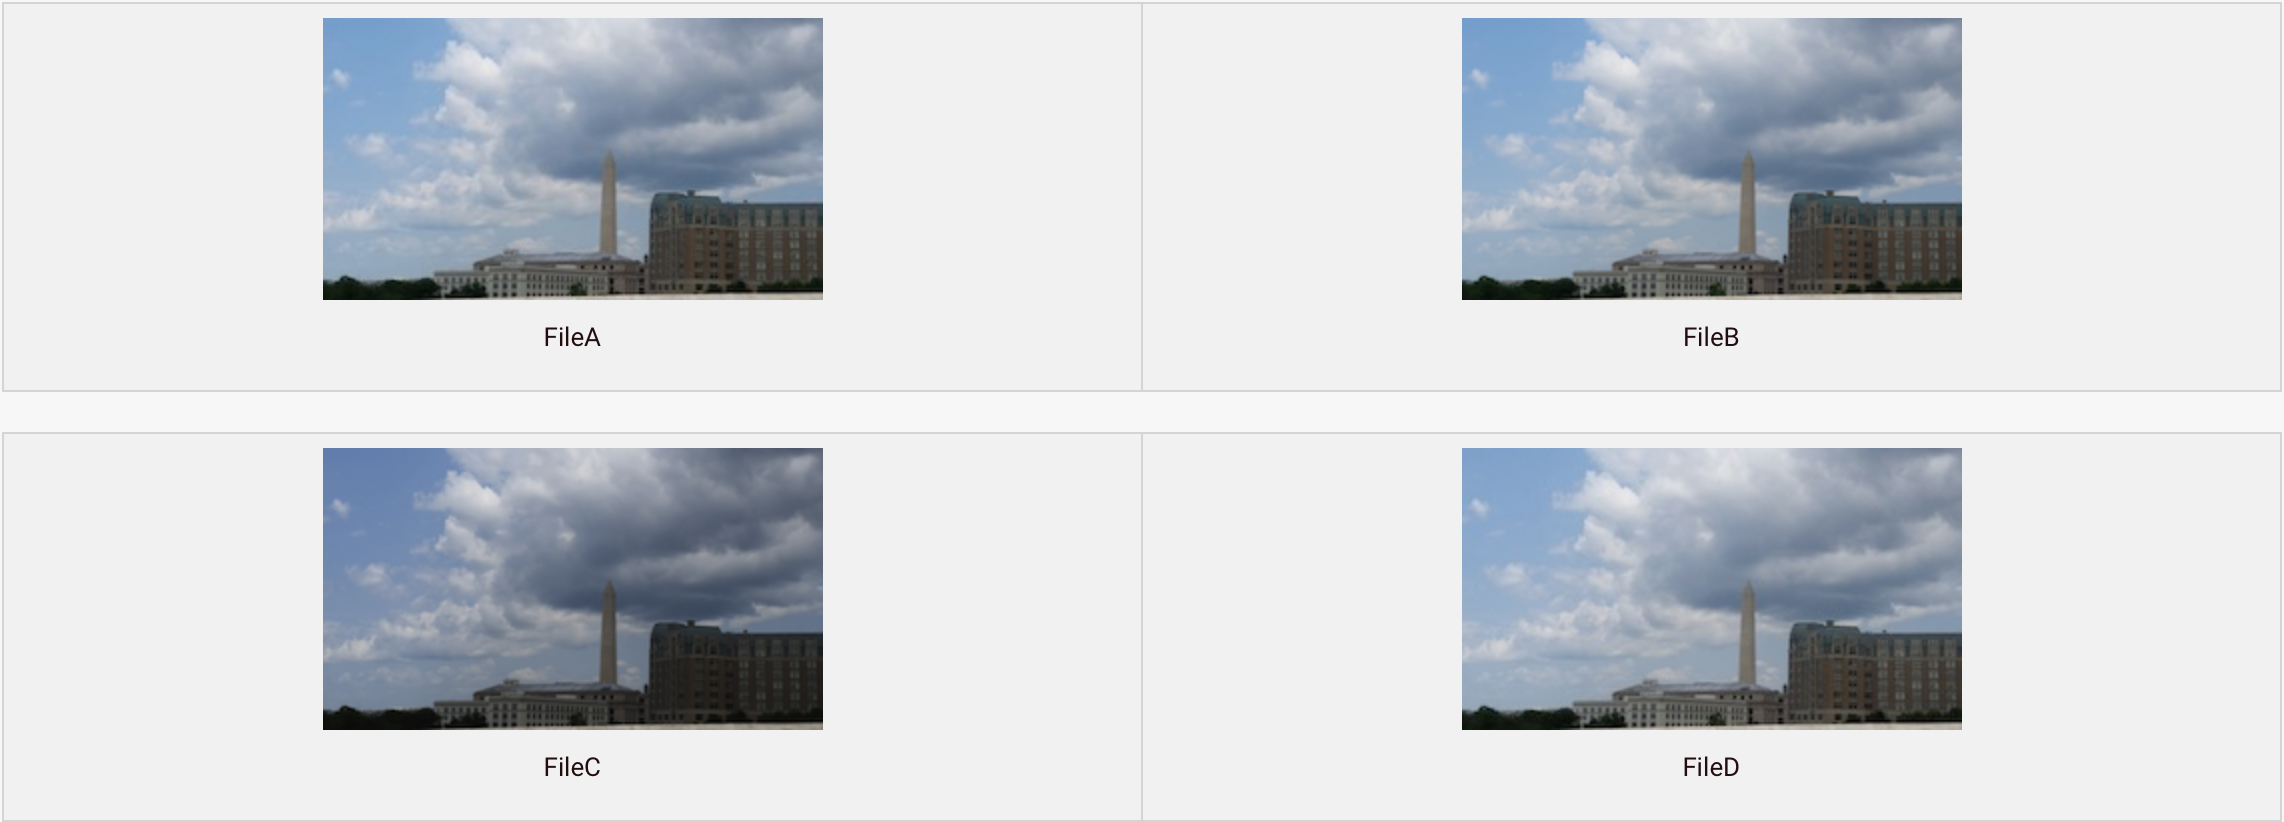
By using time stamp information from the file system, we can learn that the BMP fileD was the original file, with fileA being a copy of the original. Afterward, fileB was created by modifying fileB, and fileC was created by modifying fileA differently.
Follow along as we demonstrate.
We’ll start by analyzing images in AccessData FTK Imager, where there’s a Properties window that shows you some information about the file or folder you’ve selected.
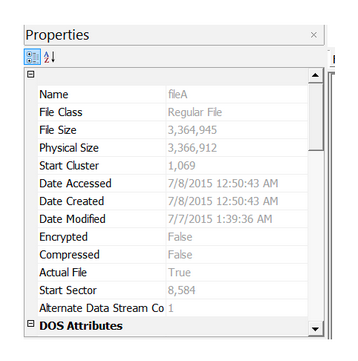

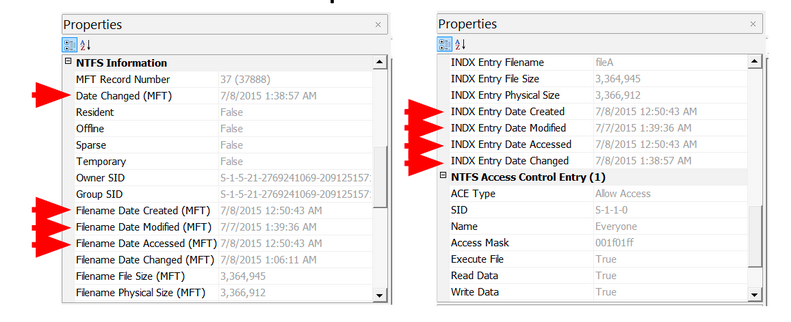
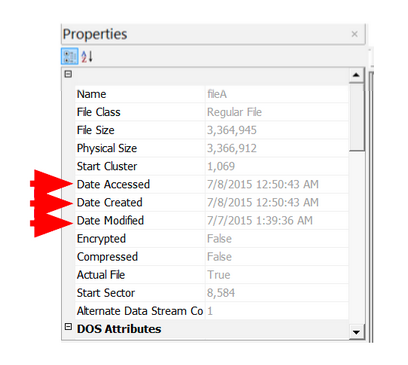
Here are the extracted MAC times for fileA, fileB, fileC, and fileD: Note, AccessData FTK Imager assumes that the file times on the drive are in UTC (Universal Coordinated Time). I subtracted four hours since the USB was set up in Eastern Standard Time. This isn’t necessary, but it helps me understand the times a bit better.
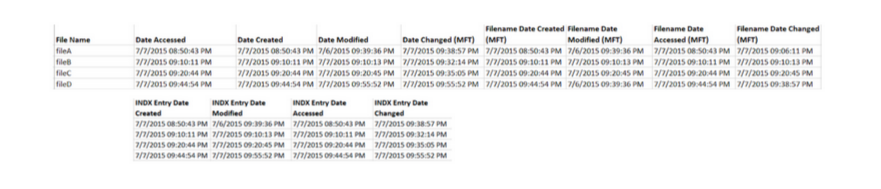
Highlight timestamps that are the same, if timestamps are off by a few seconds, they should be counted as the same. This lets you see a clear difference between different timestamps. Then, highlight oldest to newest to help put them in order.

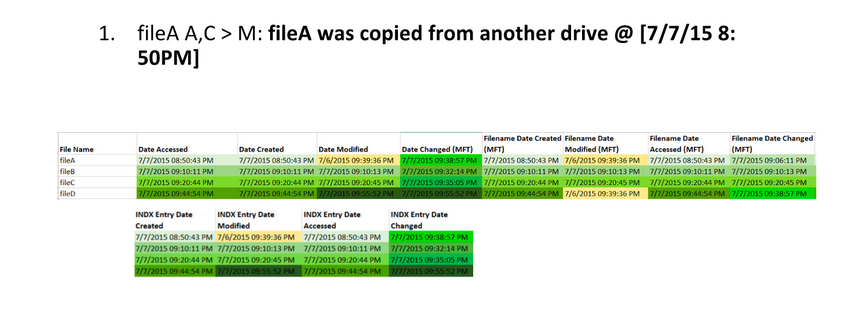
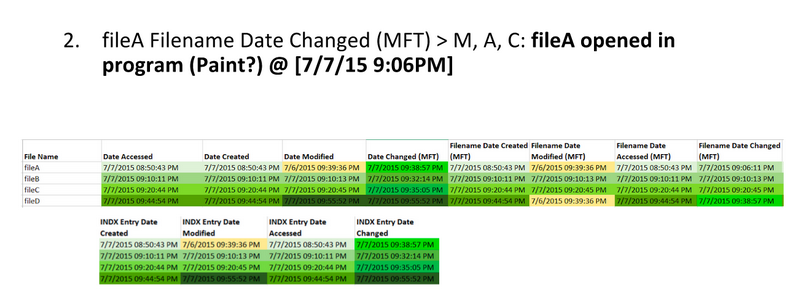
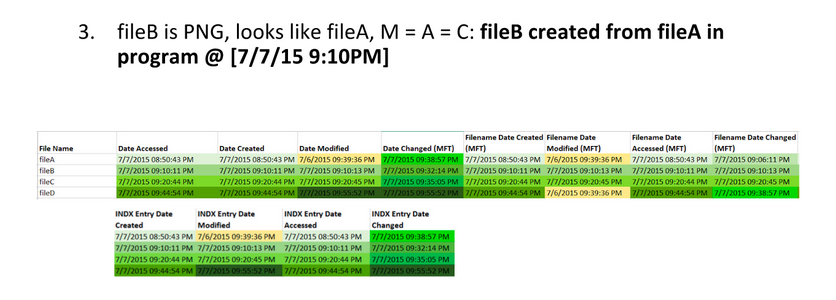
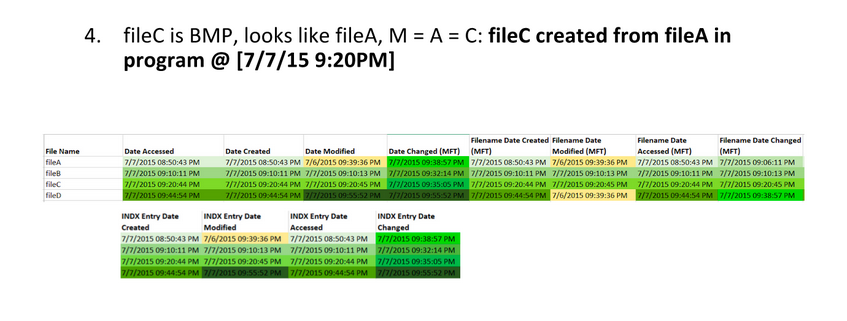
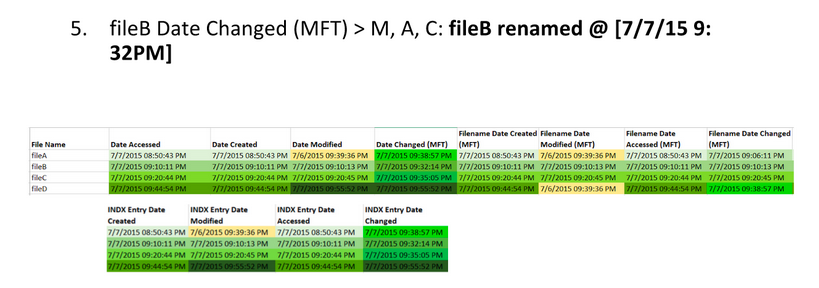
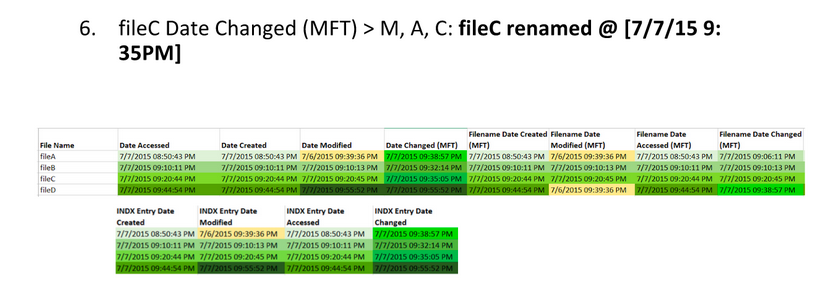
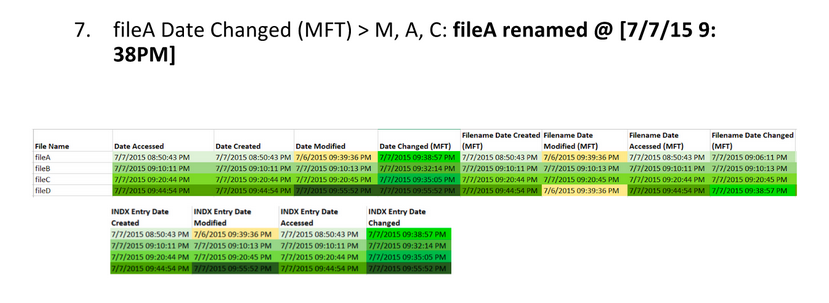
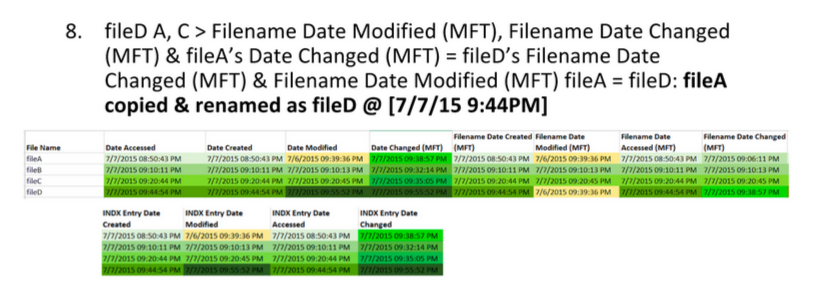
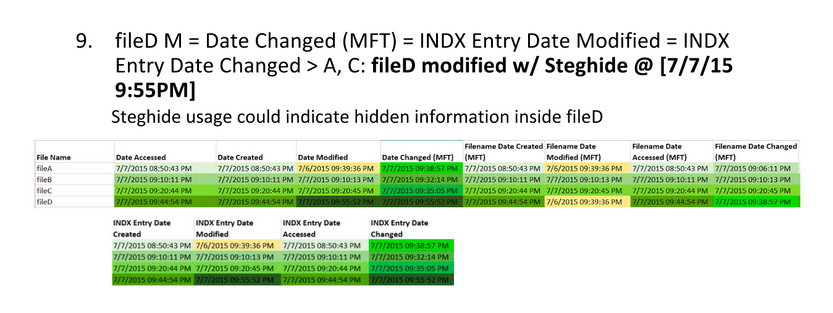
Identify timestamp patterns.
Wireshark
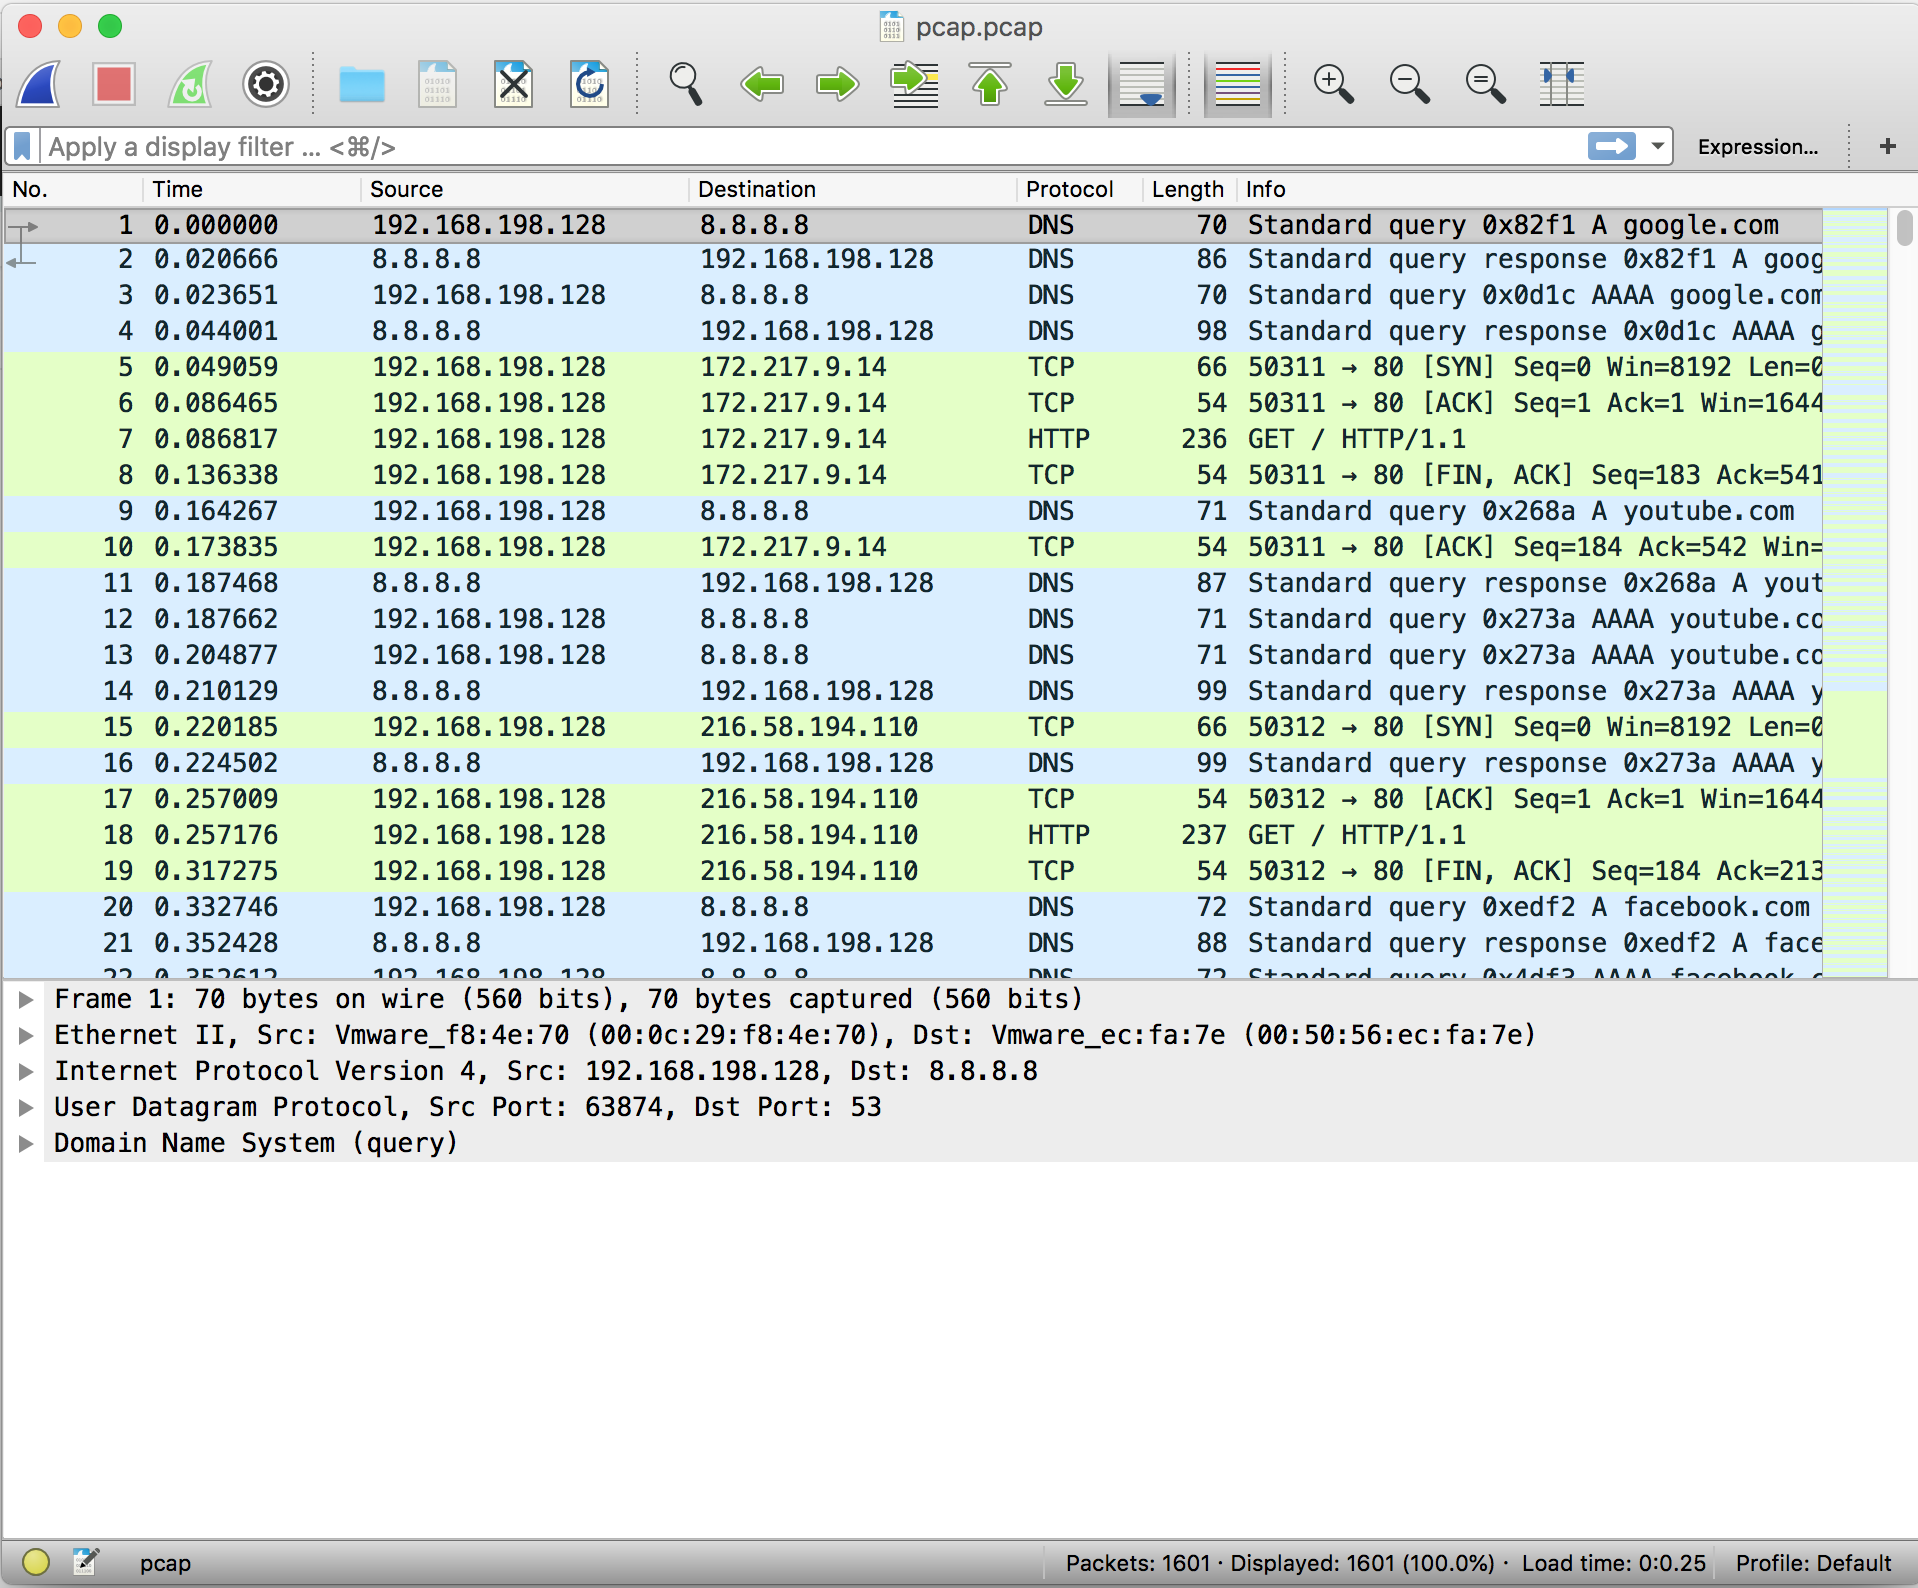
Wireshark is a network protocol analyzer that is often used in CTF challenges to look at recorded network traffic. Wireshark uses a file type called PCAP to record traffic. PCAPs are often distributed in CTF challenges to provide recorded traffic history.
Interface
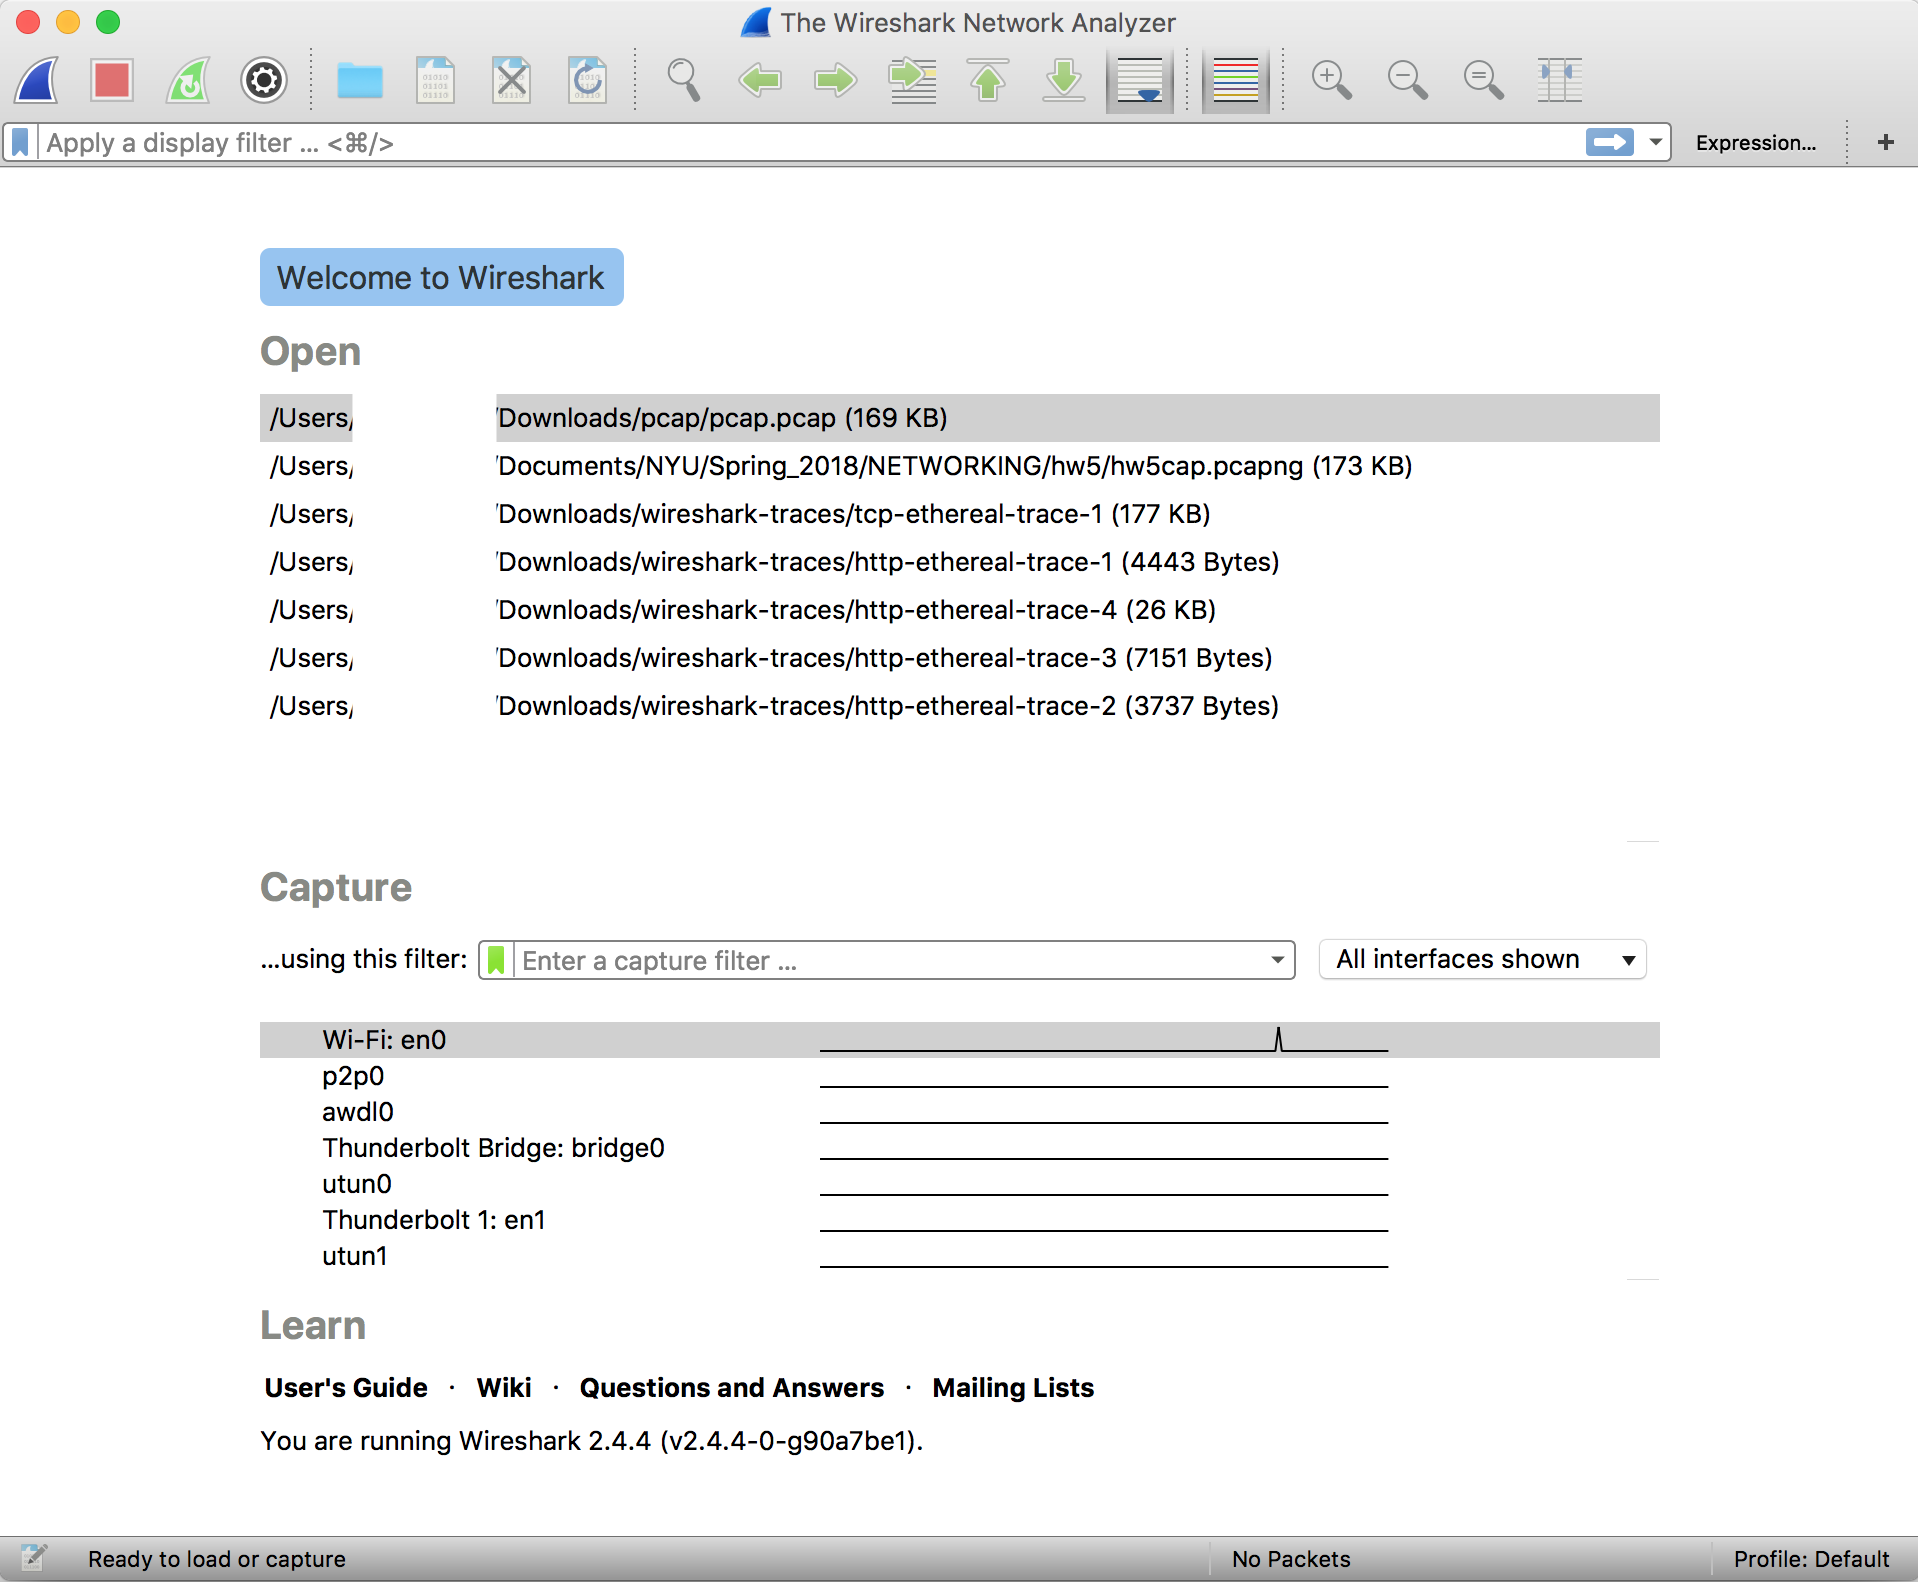
Upon opening Wireshark, you are greeted with the option to open a PCAP or begin capturing network traffic on your device.
The network traffic displayed initially shows the packets in the order in which they were captured. You can filter packets by protocol, source IP address, destination IP address, length, etc.
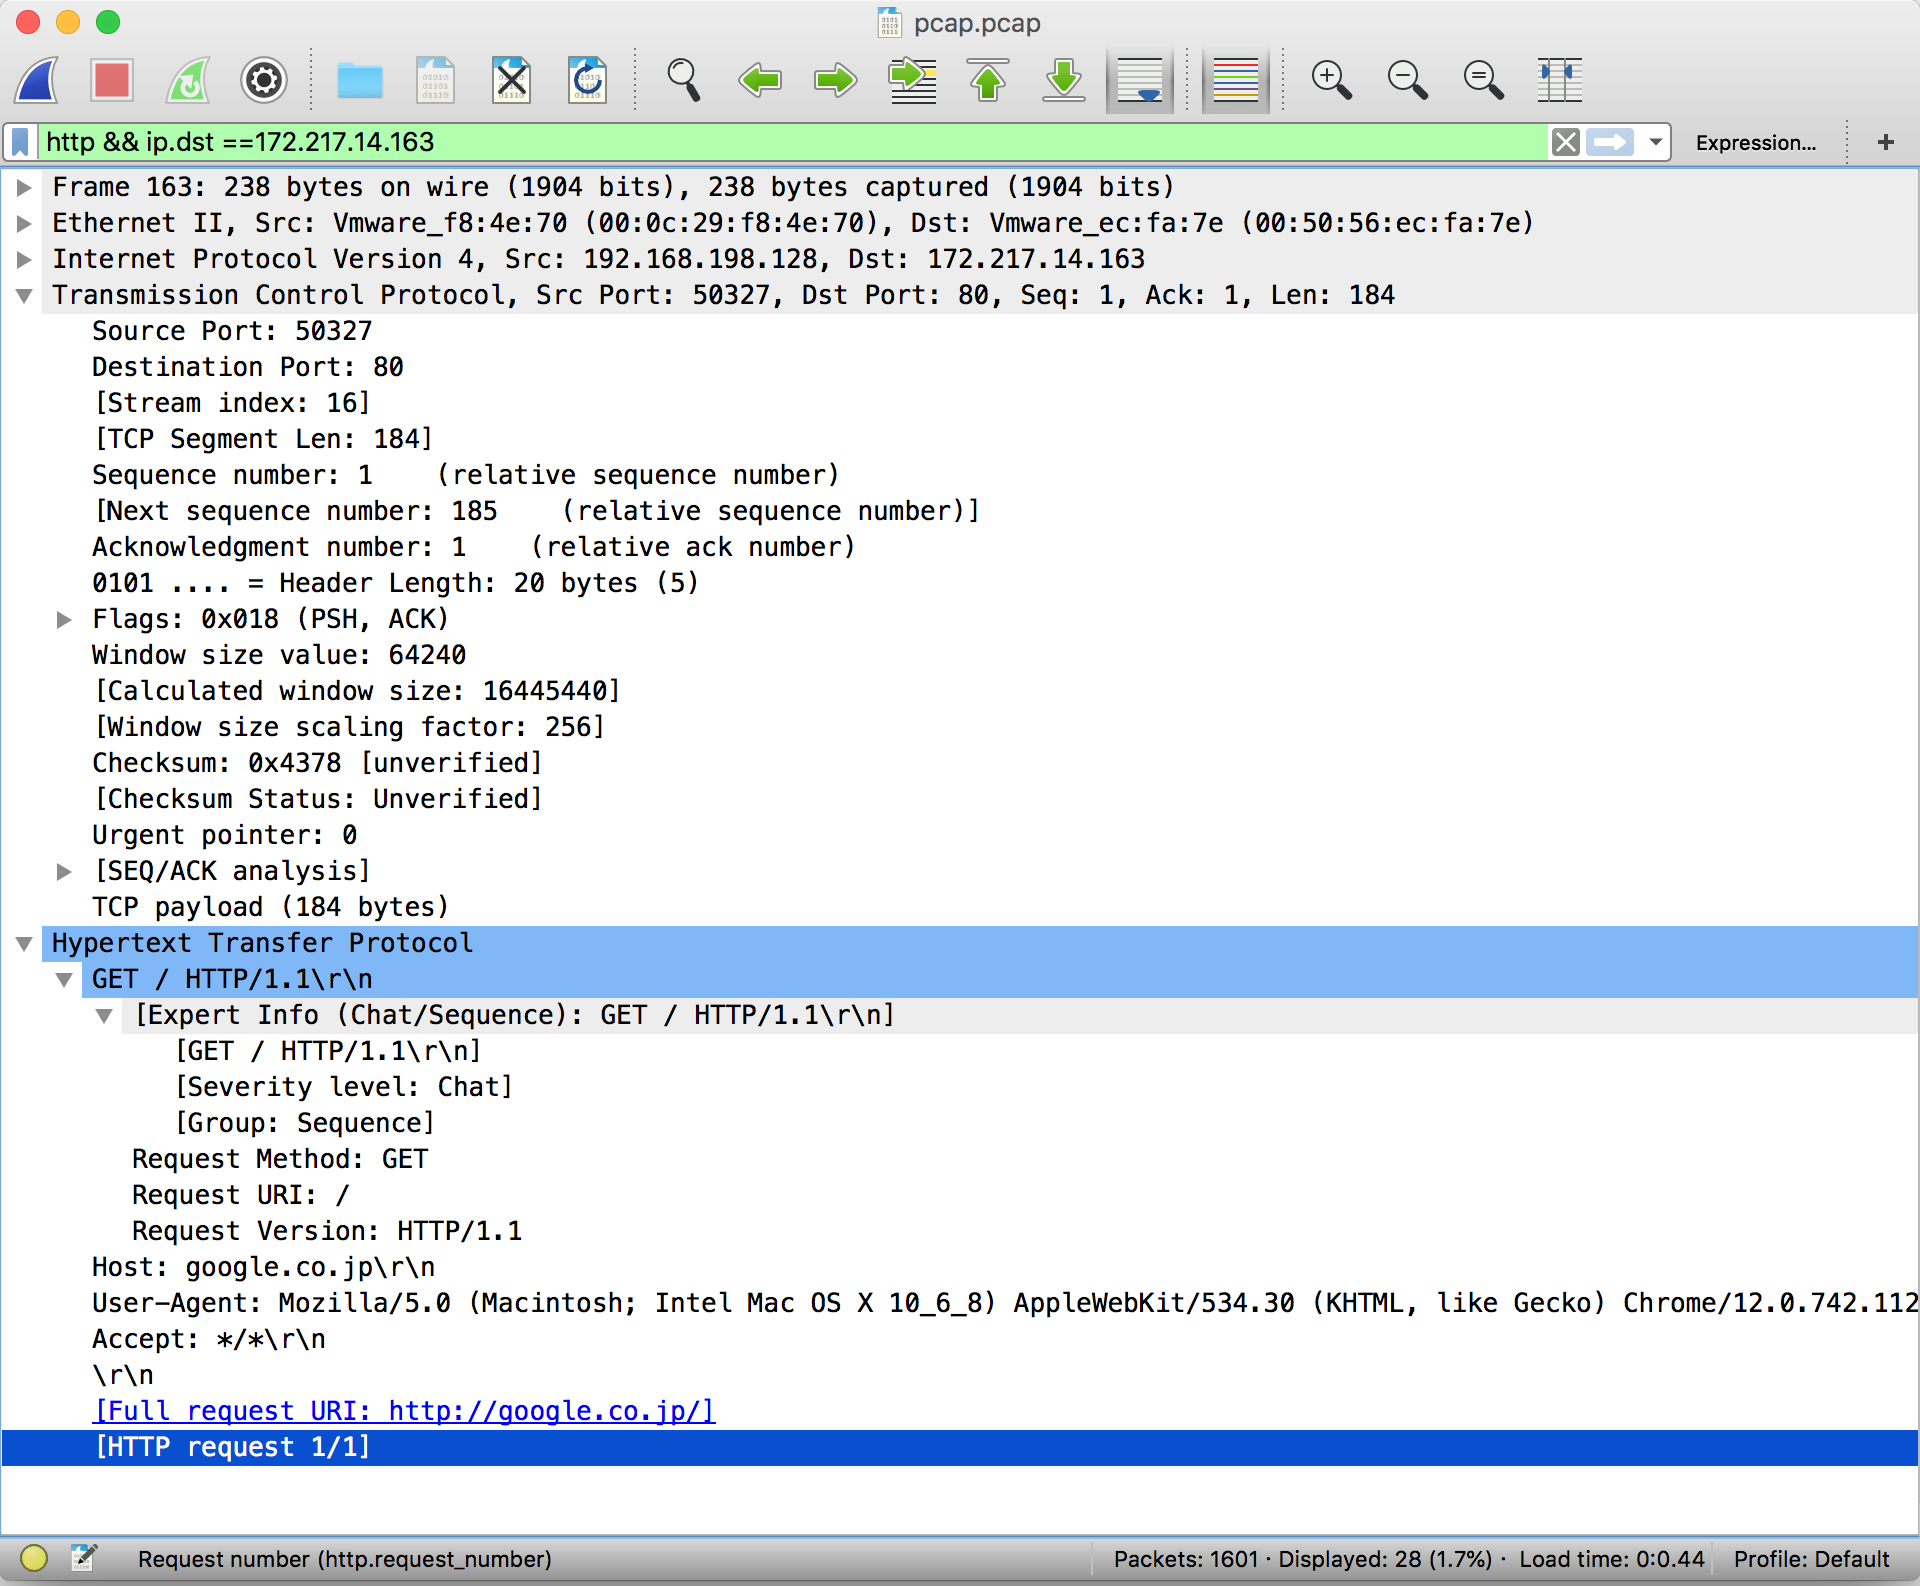
To apply filters, simply enter the constraining factor, for example, 'http', in the display filter bar.
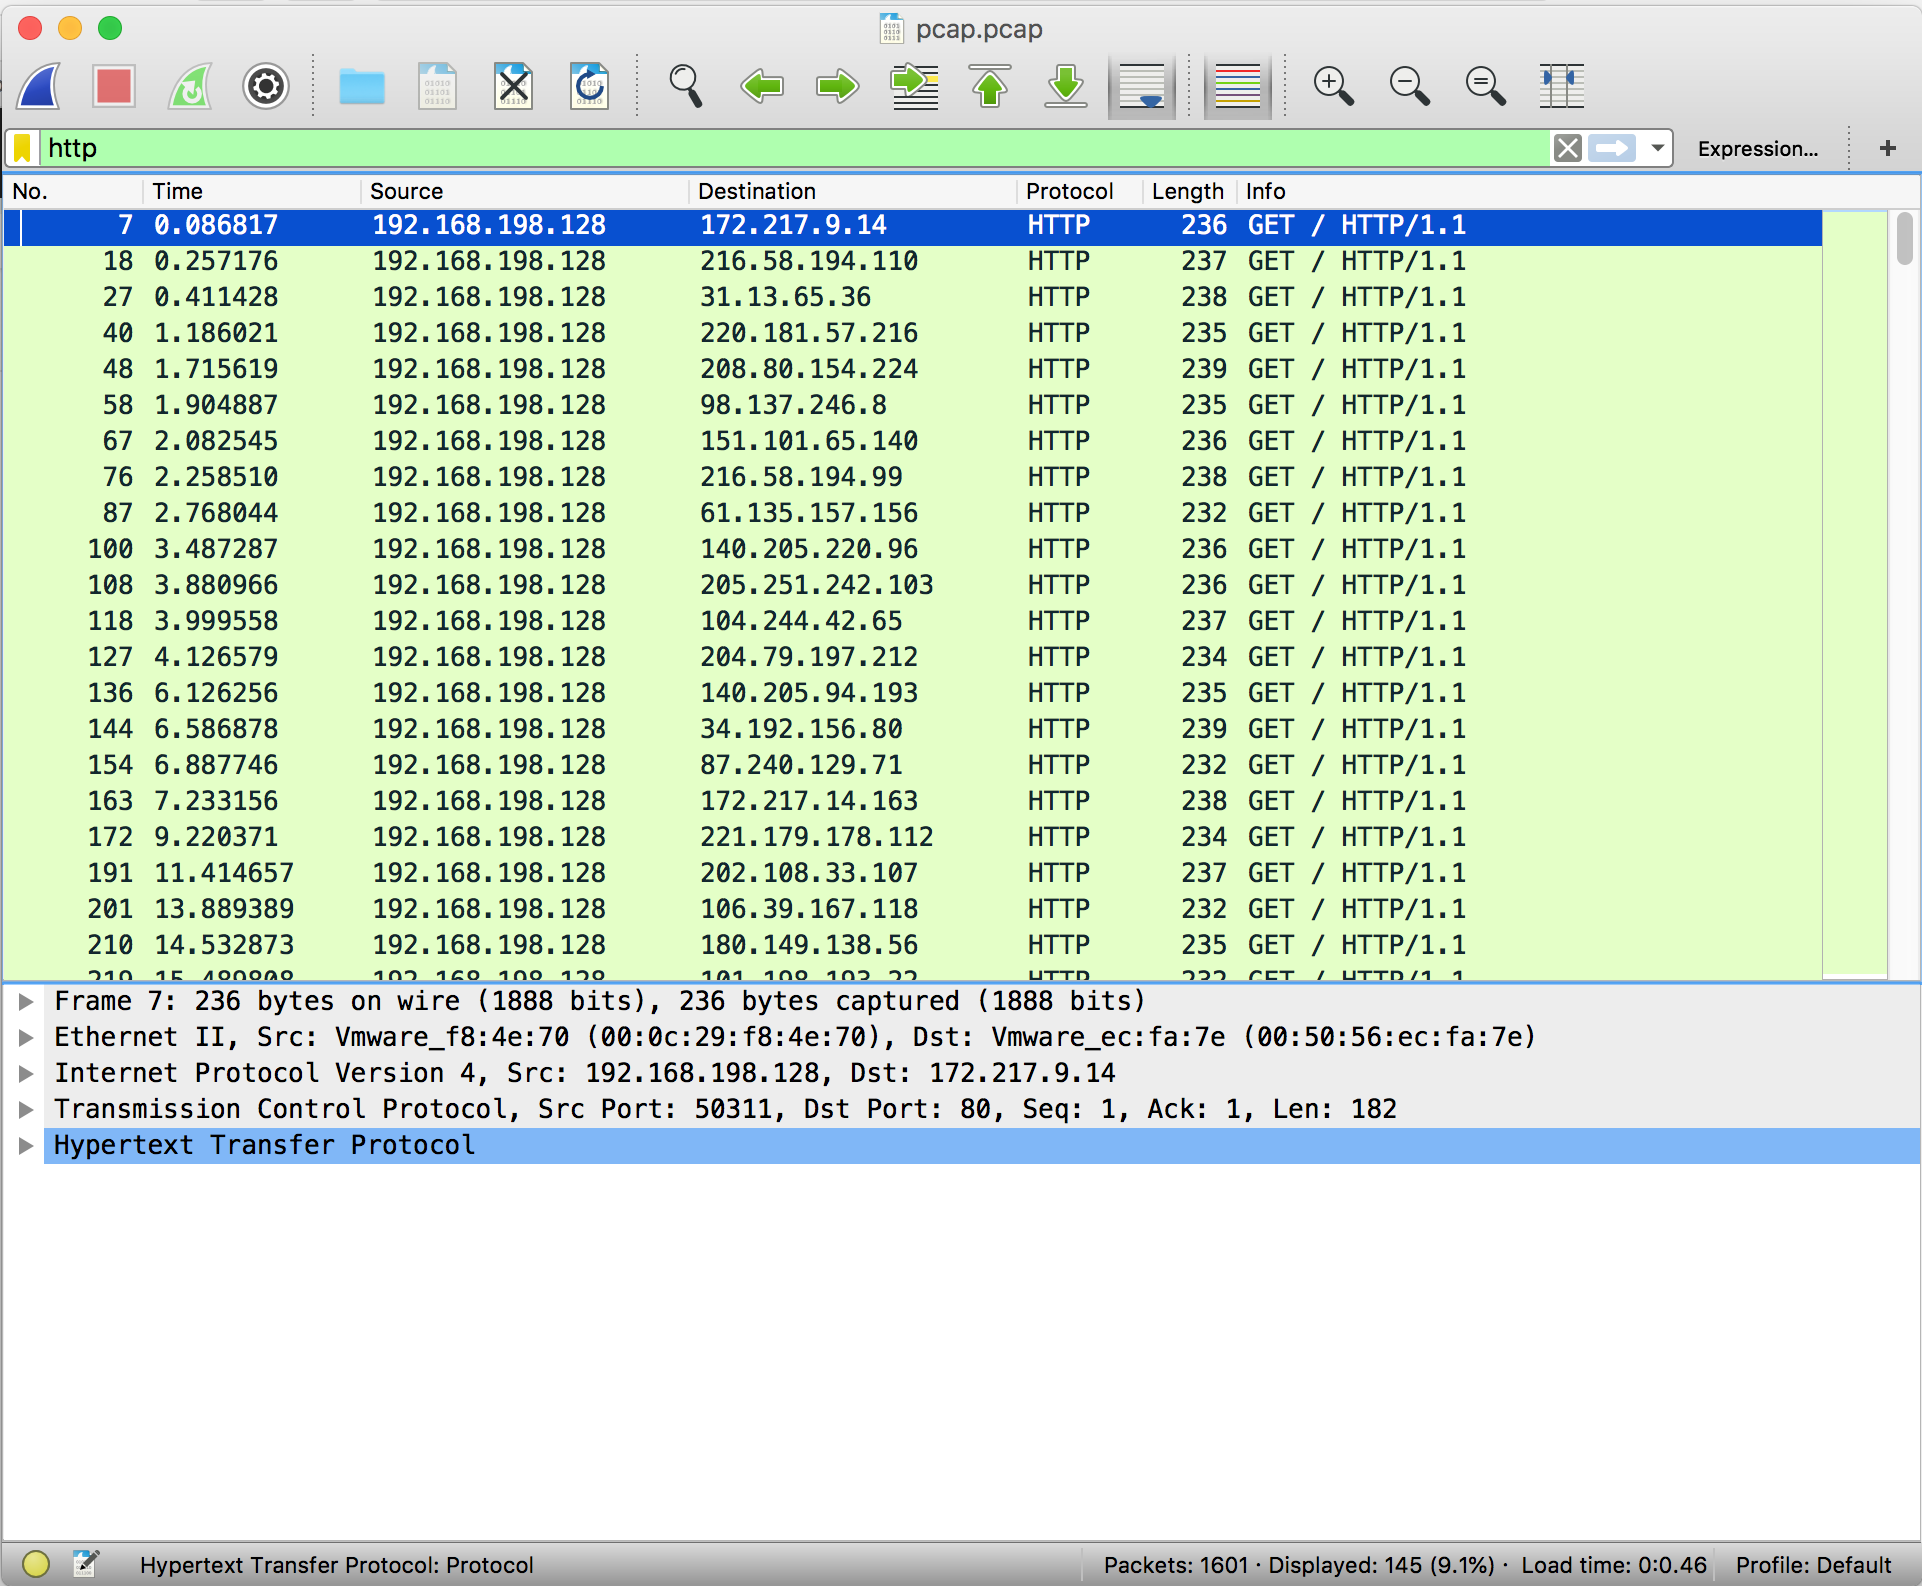
Filters can be chained together using the '&&' notation. To filter by IP, ensure a double equals '==' is used.

The most pertinent part of a packet is its data payload and protocol information.
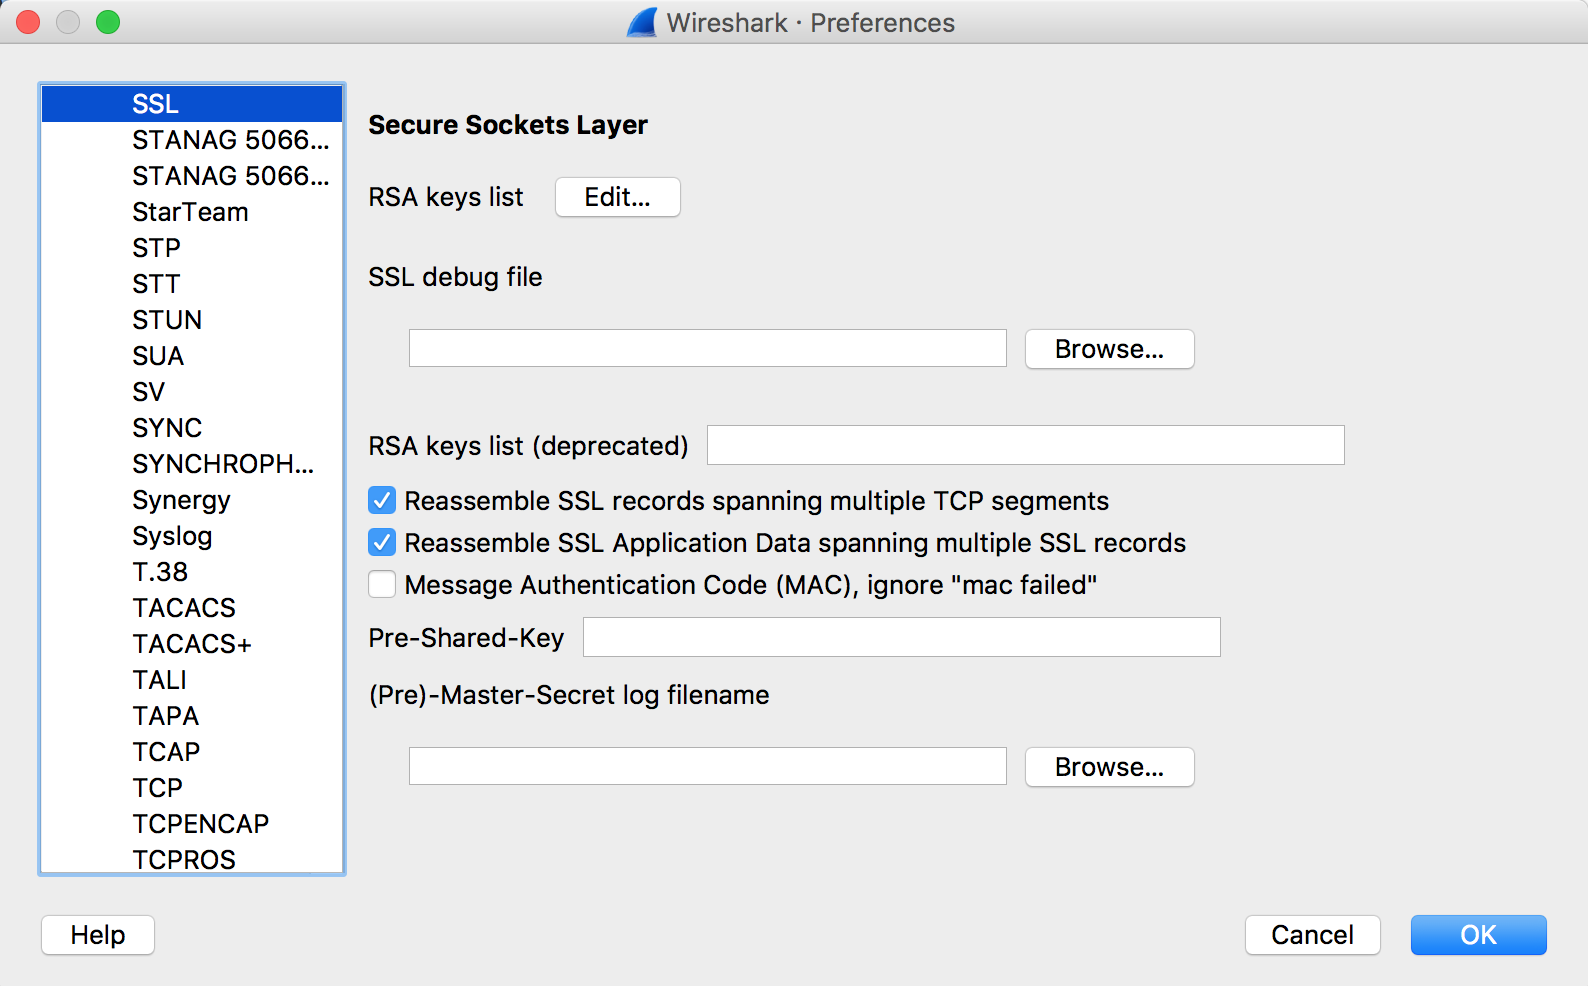
Decrypting SSL Traffic
By default, Wireshark cannot decrypt SSL traffic on your device unless you grant it specific certificates.
High-Level SSL Handshake Overview
For a network session to be encrypted properly, the client and server must share a common secret that they can use to encrypt and decrypt data without someone in the middle being able to guess. The SSL Handshake loosely follows this format:
- The client sends a list of available cipher suites it can use along with a random set of bytes referred to as client_random
- The server sends back the cipher suite that will be used, such as TLS_DHE_RSA_WITH_AES_128_CBC_SHA, along with a random set of bytes referred to as server_random
- The client generates a pre-master secret, encrypts it, then sends it to the server.
- The server and client then generate a common master secret using the selected cipher suite
- The client and server begin communicating using this common secret
Decryption Requirements
There are several ways to be able to decrypt traffic.
- If you have the client and server random values and the pre-master secret, the master secret can be generated and used to decrypt the traffic
- If you have the master secret, traffic can be decrypted easily
- If the cipher-suite uses RSA, you can factor n in the key to break the encryption on the encrypted pre-master secret and generate the master secret with the client and server randoms
Steganography
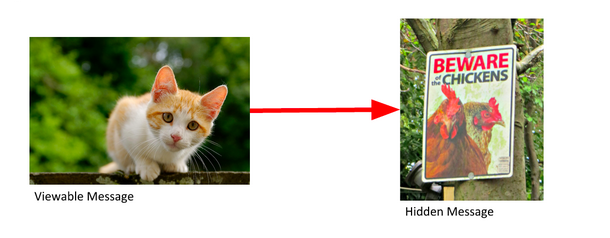
Steganography is the practice of hiding data in plain sight. Steganography is often embedded in images or audio.
You could send a picture of a cat to a friend and hide text inside. Looking at the image, there’s nothing to make anyone think there’s a message hidden inside it.

You could also hide a second image inside the first.
Steganography Detection
So we can hide text and an image, how do we find out if there is hidden data?

FileA and FileD appear the same, but they’re different. Also, FileD was modified after it was copied, so it’s possible there might be steganography in it.
FileB and FileC don’t appear to have been modified after being created. That doesn’t rule out the possibility that there’s steganography in them, but you’re more likely to find it in fileD. This brings up two questions:
- Can we determine that there is steganography in fileD?
- If there is, what was hidden in it?
LSB Steganography
Files are made of bytes. Each byte is composed of eight bits.
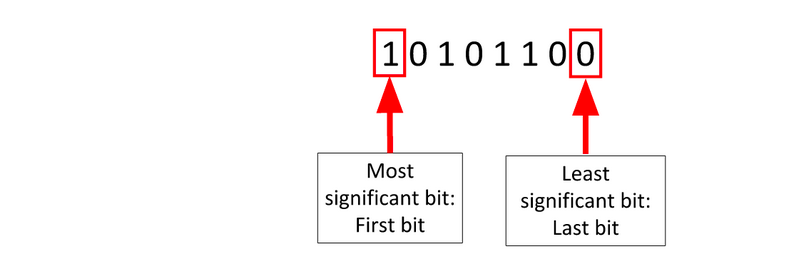
Changing the least-significant bit (LSB) doesn’t change the value very much.

So we can modify the LSB without changing the file noticeably. By doing so, we can hide a message inside.
LSB Steganography in Images
LSB Stegonagraphy or Least Significant Bit Stegonagraphy is a method of steganography where data is recorded in the lowest bit of a byte.
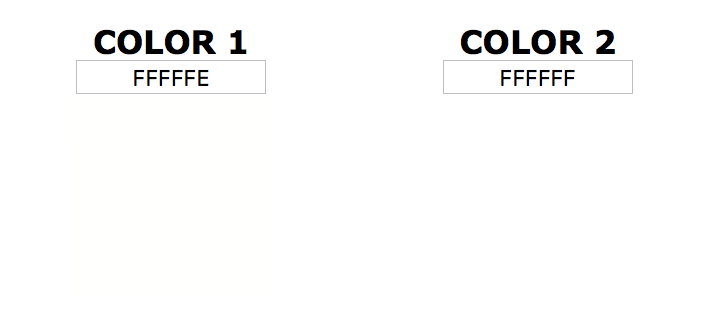
Say an image has a pixel with an RGB value of (255, 255, 255), the bits of those RGB values will look like
| 1 | 1 | 1 | 1 | 1 | 1 | 1 | 1 |
|---|---|---|---|---|---|---|---|
By modifying the lowest, or least significant, bit, we can use the 1-bit space across every RGB value for every pixel to construct a message.
| 1 | 1 | 1 | 1 | 1 | 1 | 1 | 0 |
|---|---|---|---|---|---|---|---|
The reason steganography is hard to detect by sight is that a 1-bit difference in color is insignificant as seen below.
Example
Let’s say we have an image, and part of it contains the following binary:

And let’s say we want to hide the character y inside.
First, we need to convert the hidden message to binary.

Now we take each bit from the hidden message and replace the LSB of the corresponding byte with it.

And again:

And again:

And again:

And again:

And again:

And again:

And once more:

Decoding LSB steganography is exactly the same as encoding, but in reverse. For each byte, grab the LSB and add it to your decoded message. Once you’ve gone through each byte, convert all the LSBs you grabbed into text or a file. (You can use your file signature knowledge here!)
What other types of steganography are there?
Steganography is hard for the defense side because there’s practically an infinite number of ways it could be carried out. Here are a few examples: - LSB steganography: different bits, different bit combinations - Encode in every certain number of bytes - Use a password - Hide in different places - Use encryption on top of steganography.
Disk Imaging
A forensic image is an electronic copy of a drive (e.g. a hard drive, USB, etc.). It’s a bit-by-bit or bitstream file that’s an exact, unaltered copy of the media being duplicated.
Wikipedia said that the most straightforward disk imaging method is to read a disk from start to finish and write the data to a forensics image format. “This can be a time-consuming process, especially for disks with a large capacity,” Wikipedia said.
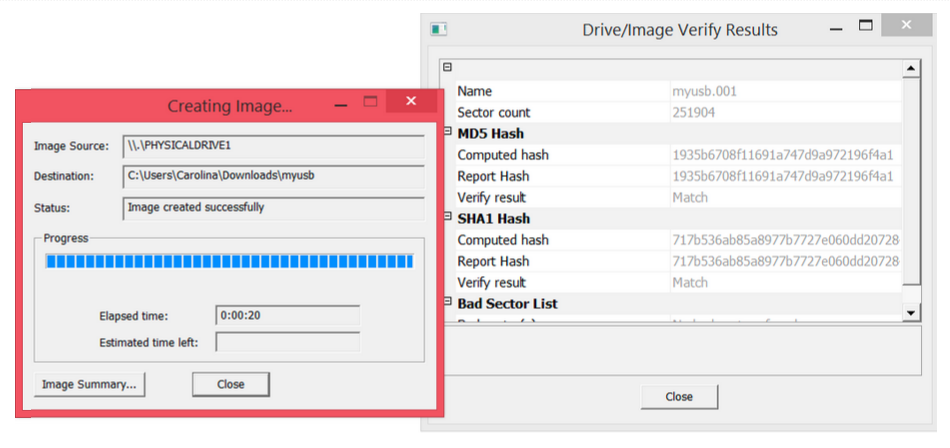
To prevent write access to the disk, you can use a write blocker. It’s also common to calculate a cryptographic hash of the entire disk when imaging it. “Commonly-used cryptographic hashes are MD5, SHA1, and/or SHA256,” said Wikipedia. “By recalculating the integrity hash at a later time, one can determine if the data in the disk image has been changed. This by itself does not protect against intentional tampering, but it can indicate that the data was altered, e.g. due to corruption.”
Why image a disk? Forensic imaging: - Prevents tampering with the original data evidence - Allows you to play around with the copy, without worrying about messing up the original
Forensic Image Extraction Example
This example uses the tool AccessData FTK Imager.
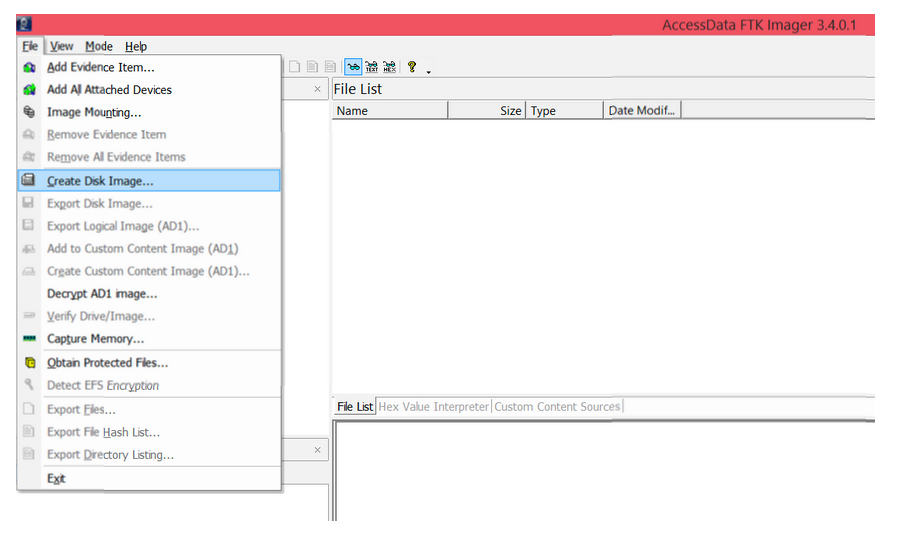
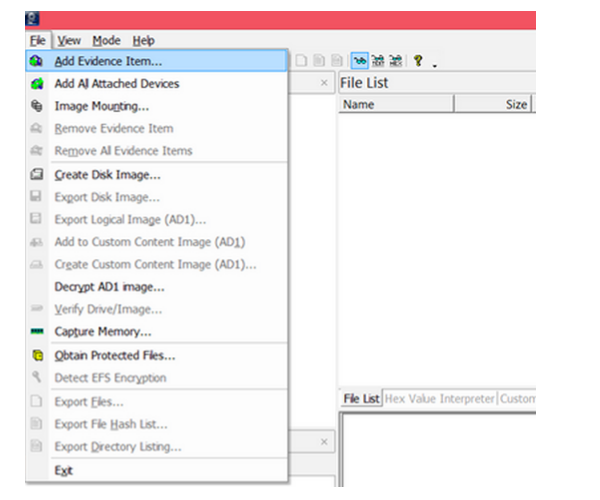
Step 1: Go to File > Create Disk Image
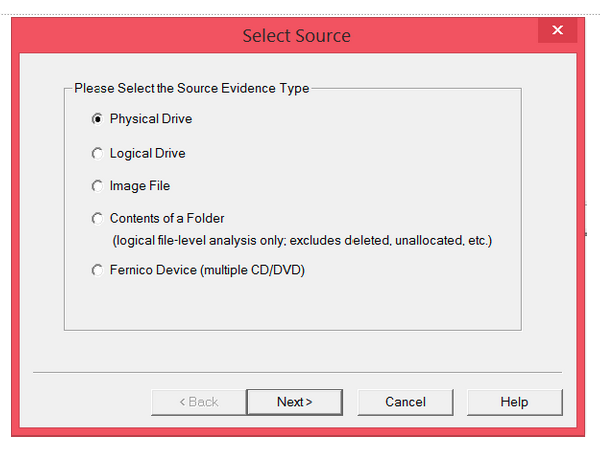
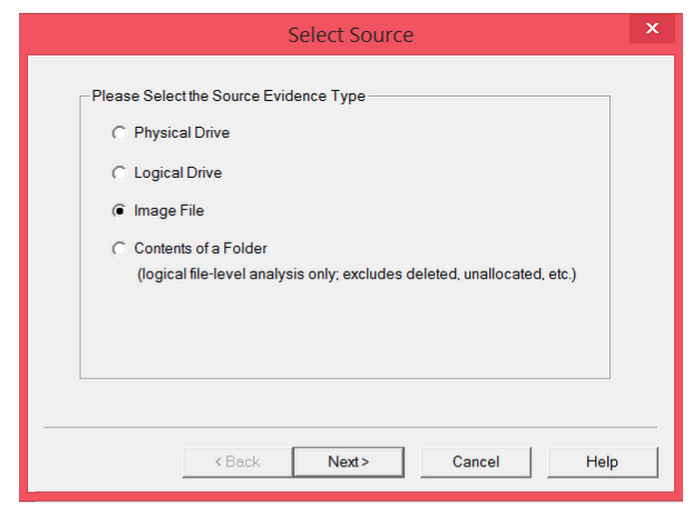
Step 2: Select Physical Drive, because the USB or hard drive you’re imaging is a physical device or drive.
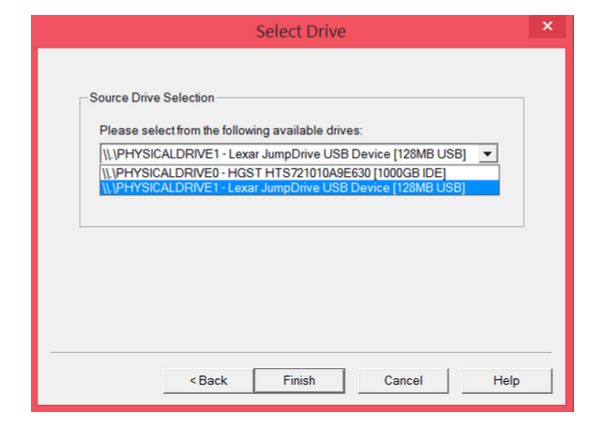
Step 3: Select the drive you’re imaging. The 1000 GB is my computer hard drive; the 128 MB is the USB that I want to image.
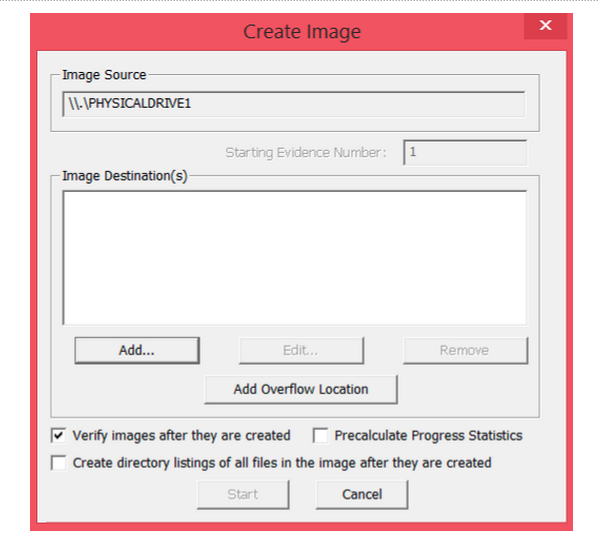
Step 4: Add a new image destination
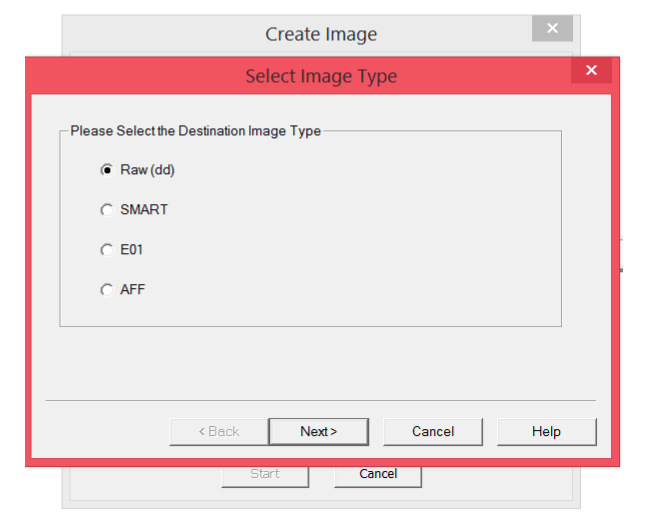
Step 5: Select whichever image type you want. Choose Raw (dd) if you’re a beginner, since it’s the most common type
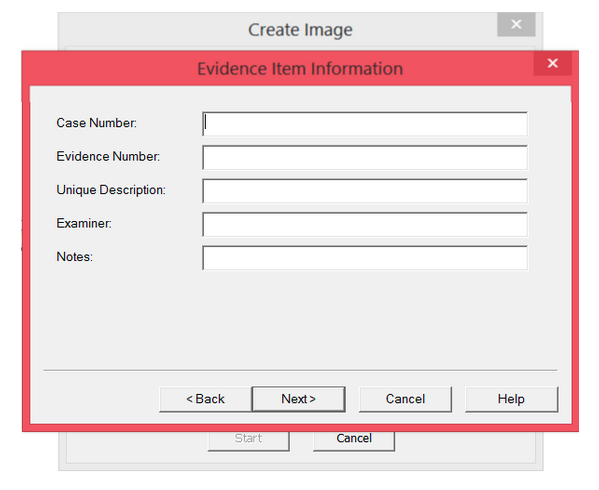
Step 6: Fill in all the evidence information
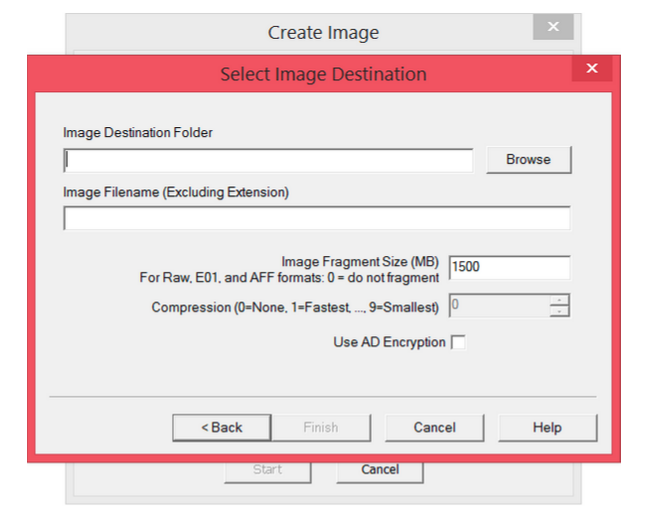
Step 7: Choose where you want to store it
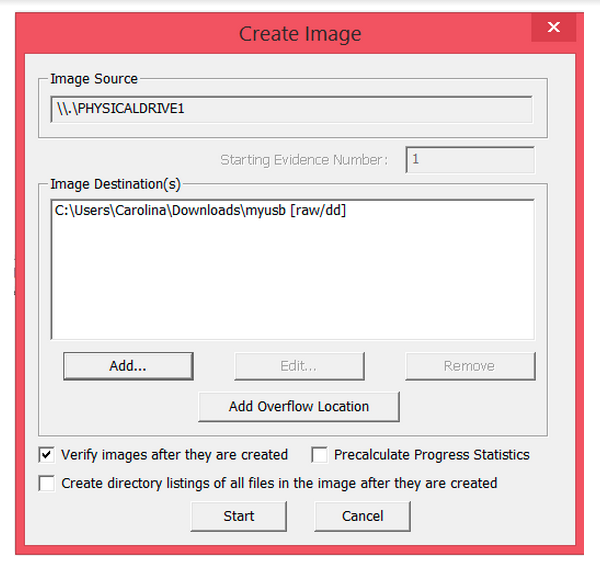
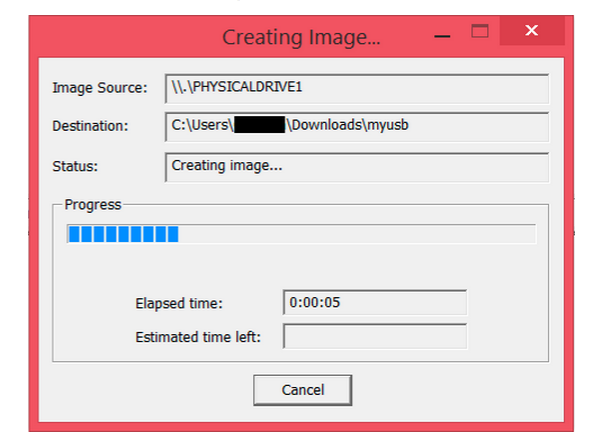
Step 8: The image destination has been added. Now you can start the image extraction
Step 9: Wait for the image to be extracted
Step 10: This is the completed extraction
Step 11: Add the image you just created so that you can view it
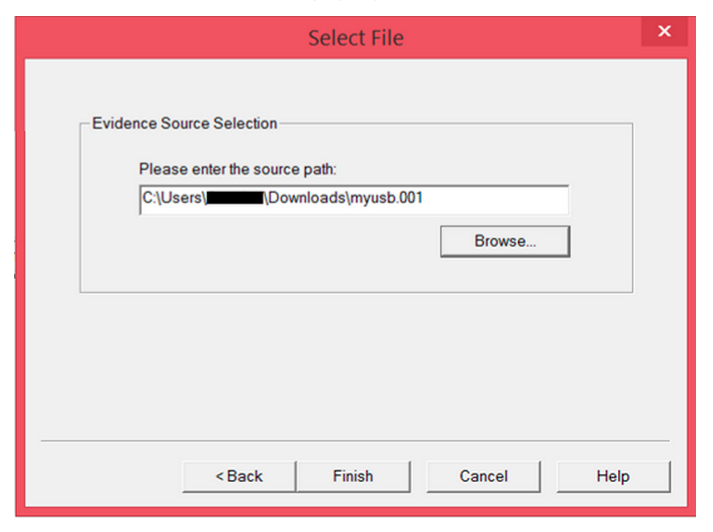
Step 12: This time, choose the image file, since that’s what you just created
Step 13: Enter the path of the image you just created
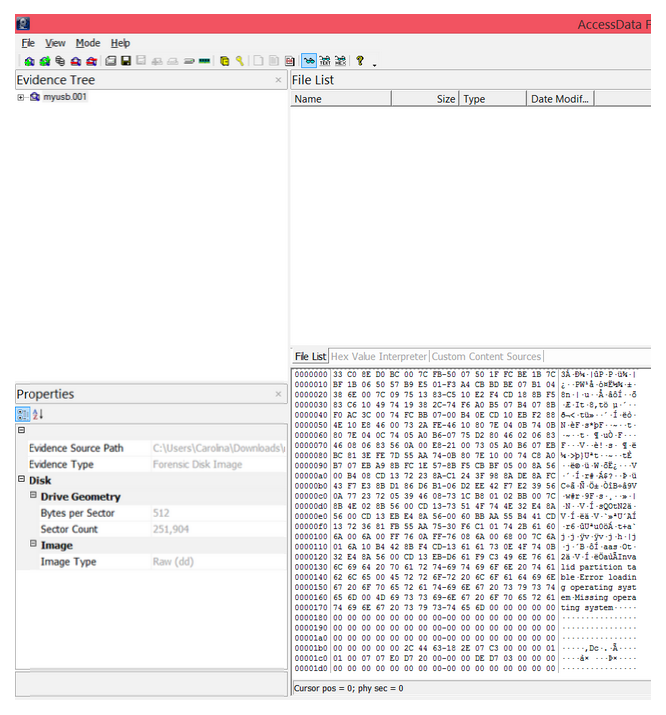
Step 14: View the image.
- Evidence tree Structure of the drive image
- File list List of all the files in the drive image folder
- Properties Properties of the file/folder being examined
- Hex viewer View of the drive/folders/files in hexadecimal
Step 15: To view files in the USB, go to Partition 1 > [USB name] > [root] in the Evidence Tree and look in the File List
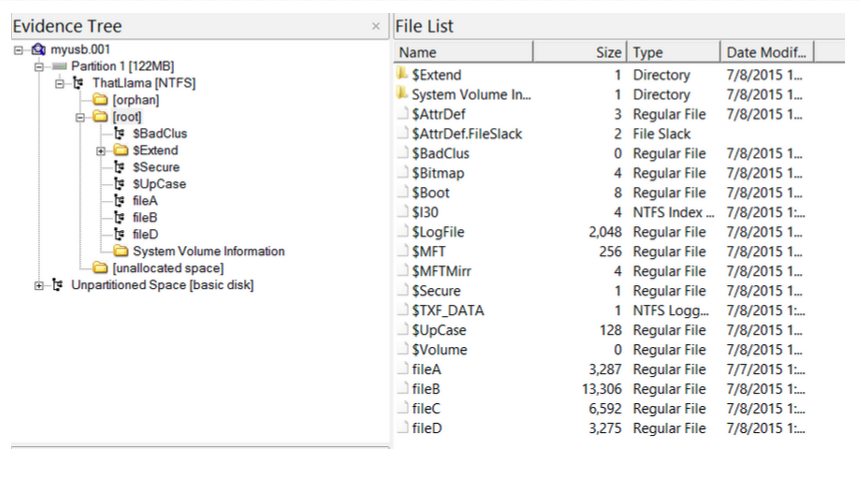
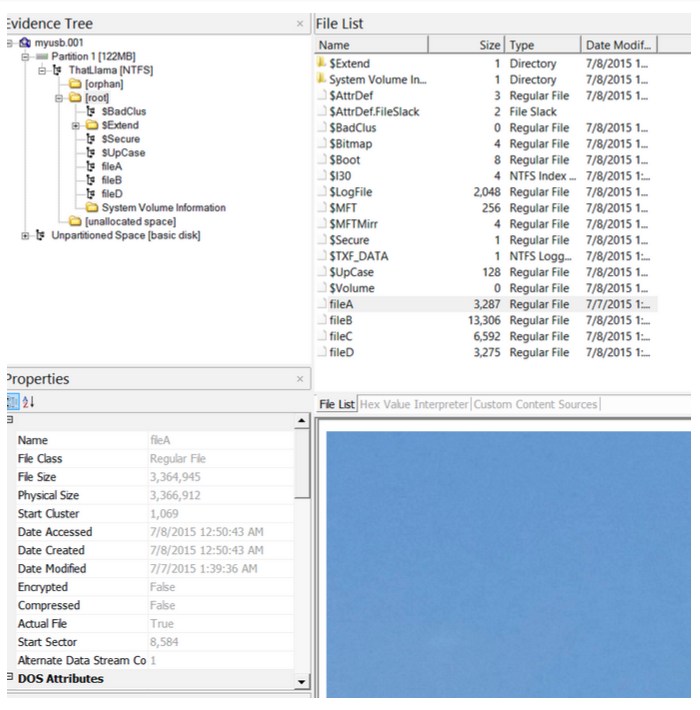
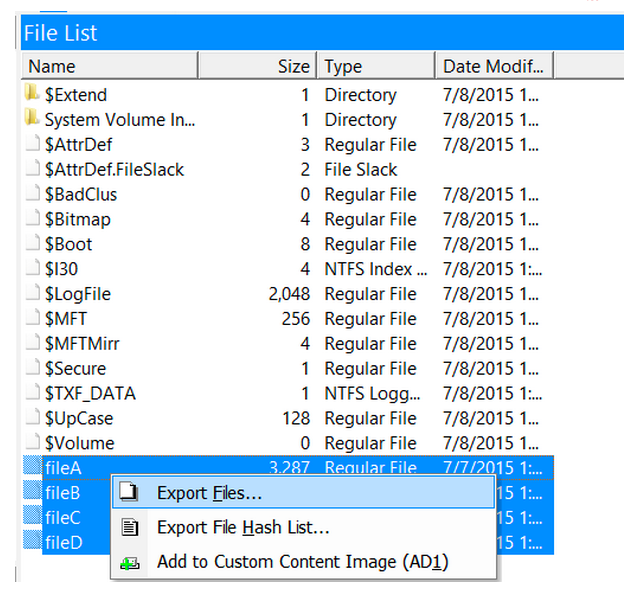
Step 16: Selecting fileA, fileB, fileC, or fileD gives us some properties of the files & a preview of each photo
Step 17: Extract files of interest for further analysis by selecting, right-clicking, and choosing Export Files
Memory Forensics
There are plenty of traces of someone's activity on a computer, but perhaps some of the most valuable information can be found within memory dumps, that is images taken of RAM. These dumps of data are often very large but can be analyzed using a tool called Volatility
Volatility Basics
Memory forensics isn't all that complicated, the hardest part would be using your toolset correctly. A good workflow is as follows:
- Run
stringsfor clues - Identify the image profile (which OS, version, etc.)
- Dump processes and look for suspicious processes
- Dump data related interesting processes
- View data in a format relating to the process (Word: docx, Notepad: txt, Photoshop: psd, etc.)
Profile Identification
To properly use Volatility you must supply a profile with --profile=PROFILE, therefore before any sleuthing, you need to determine the profile using imageinfo:
$ python vol.py -f ~/image.raw imageinfo
Volatility Foundation Volatility Framework 2.4
Determining profile based on KDBG search...

          Suggested Profile(s) : Win7SP0x64, Win7SP1x64, Win2008R2SP0x64, Win2008R2SP1x64
                     AS Layer1 : AMD64PagedMemory (Kernel AS)
                     AS Layer2 : FileAddressSpace (/Users/Michael/Desktop/win7_trial_64bit.raw)
                      PAE type : PAE
                           DTB : 0x187000L
                          KDBG : 0xf80002803070
          Number of Processors : 1
     Image Type (Service Pack) : 0
                KPCR for CPU 0 : 0xfffff80002804d00L
             KUSER_SHARED_DATA : 0xfffff78000000000L
           Image date and time : 2012-02-22 11:29:02 UTC+0000
     Image local date and time : 2012-02-22 03:29:02 -0800
Dump Processes
To view processes, the pslist or pstree, or psscan command can be used.
$ python vol.py -f ~/image.raw pslist --profile=Win7SP0x64 pstree
Volatility Foundation Volatility Framework 2.5
Offset(V)          Name                    PID   PPID   Thds     Hnds   Sess  Wow64 Start                          Exit
------------------ -------------------- ------ ------ ------ -------- ------ ------ ------------------------------ ------------------------------
0xffffa0ee12532180 System                    4      0    108        0 ------      0 2018-04-22 20:02:33 UTC+0000
0xffffa0ee1389d040 smss.exe                232      4      3        0 ------      0 2018-04-22 20:02:33 UTC+0000
...
0xffffa0ee128c6780 VBoxTray.exe           3324   1123     10        0      1      0 2018-04-22 20:02:55 UTC+0000
0xffffa0ee14108780 OneDrive.exe           1422   1123     10        0      1      1 2018-04-22 20:02:55 UTC+0000
0xffffa0ee14ade080 svchost.exe             228    121      1        0      1      0 2018-04-22 20:14:43 UTC+0000
0xffffa0ee1122b080 notepad.exe            2019   1123      1        0      1      0 2018-04-22 20:14:49 UTC+0000
Process Memory Dump
Dumping the memory of a process can prove to be fruitful, say we want to dump the data from notepad.exe:
$ python vol.py -f ~/image.raw --profile=Win7SP0x64 memdump -p 2019 -D dump/
Volatility Foundation Volatility Framework 2.4
************************************************************************
Writing System [     2019] to 2019.dmp

$ ls -alh dump/2019.dmp
-rw-r--r--  1 user  staff   111M Apr 22 20:47 dump/2019.dmp
Other Useful Commands
There are plenty of commands that Volatility offers but some highlights include:
$ python vol.py -f IMAGE --profile=PROFILE connections: view network connections$ python vol.py -f IMAGE --profile=PROFILE cmdscan: view commands that were run in cmd prompt
Hex Editor
A hexadecimal (hex) editor (also called a binary file editor or byte editor) is a computer program you can use to manipulate the fundamental binary data that constitutes a computer file. The name “hex” comes from “hexadecimal,” a standard numerical format for representing binary data. A typical computer file occupies multiple areas on the platter(s) of a disk drive, whose contents are combined to form the file. Hex editors that are designed to parse and edit sector data from the physical segments of floppy or hard disks are sometimes called sector editors or disk editors. A hex editor is used to see or edit the raw, exact contents of a file. Hex editors may be used to correct data corrupted by a system or application. A list of editors can be found on the forensics Wiki. You can download one and install it on your system.
Example
Open fileA.jpg in a hex editor. (Most Hex editors have either a “File > Open” option or a simple drag and drop.)

When you open fileA.jpg in your hex editor, you should see something similar to this:
Your hex editor should also have a “go to” or “find” feature so you can jump to a specific byte.